How to generate a client report
EssentialWP Warden generates professional 24-section PDF reports covering site health, security, backups, uptime, SEO, costs, and more — all automatically populated from your live data.
-
Go to Clients
Click Clients in the sidebar to open the client list. -
Click the “Report” button
On the client’s row, click the Report button to open the Report modal for that client. -
Set the date range
Choose the period the report should cover. The default is the last 30 days. All data (activity, backups, analytics, errors) is filtered to this window. -
Select which sections to include
All 24 report sections are listed with toggles, grouped into six categories (Site Info, Updates, Security, Operations, Content & Analytics, Financial). Turn off any sections not relevant to this client. Common sections to include: Site Health, Plugin Inventory, Security Status, Backups, Uptime, and Activity Log. -
Preview or download the report
Click Refresh to render the report inside the modal, then Full Review to open the same HTML report in a new browser tab. Click Download PDF to export a professional PDF rendered by the backend.
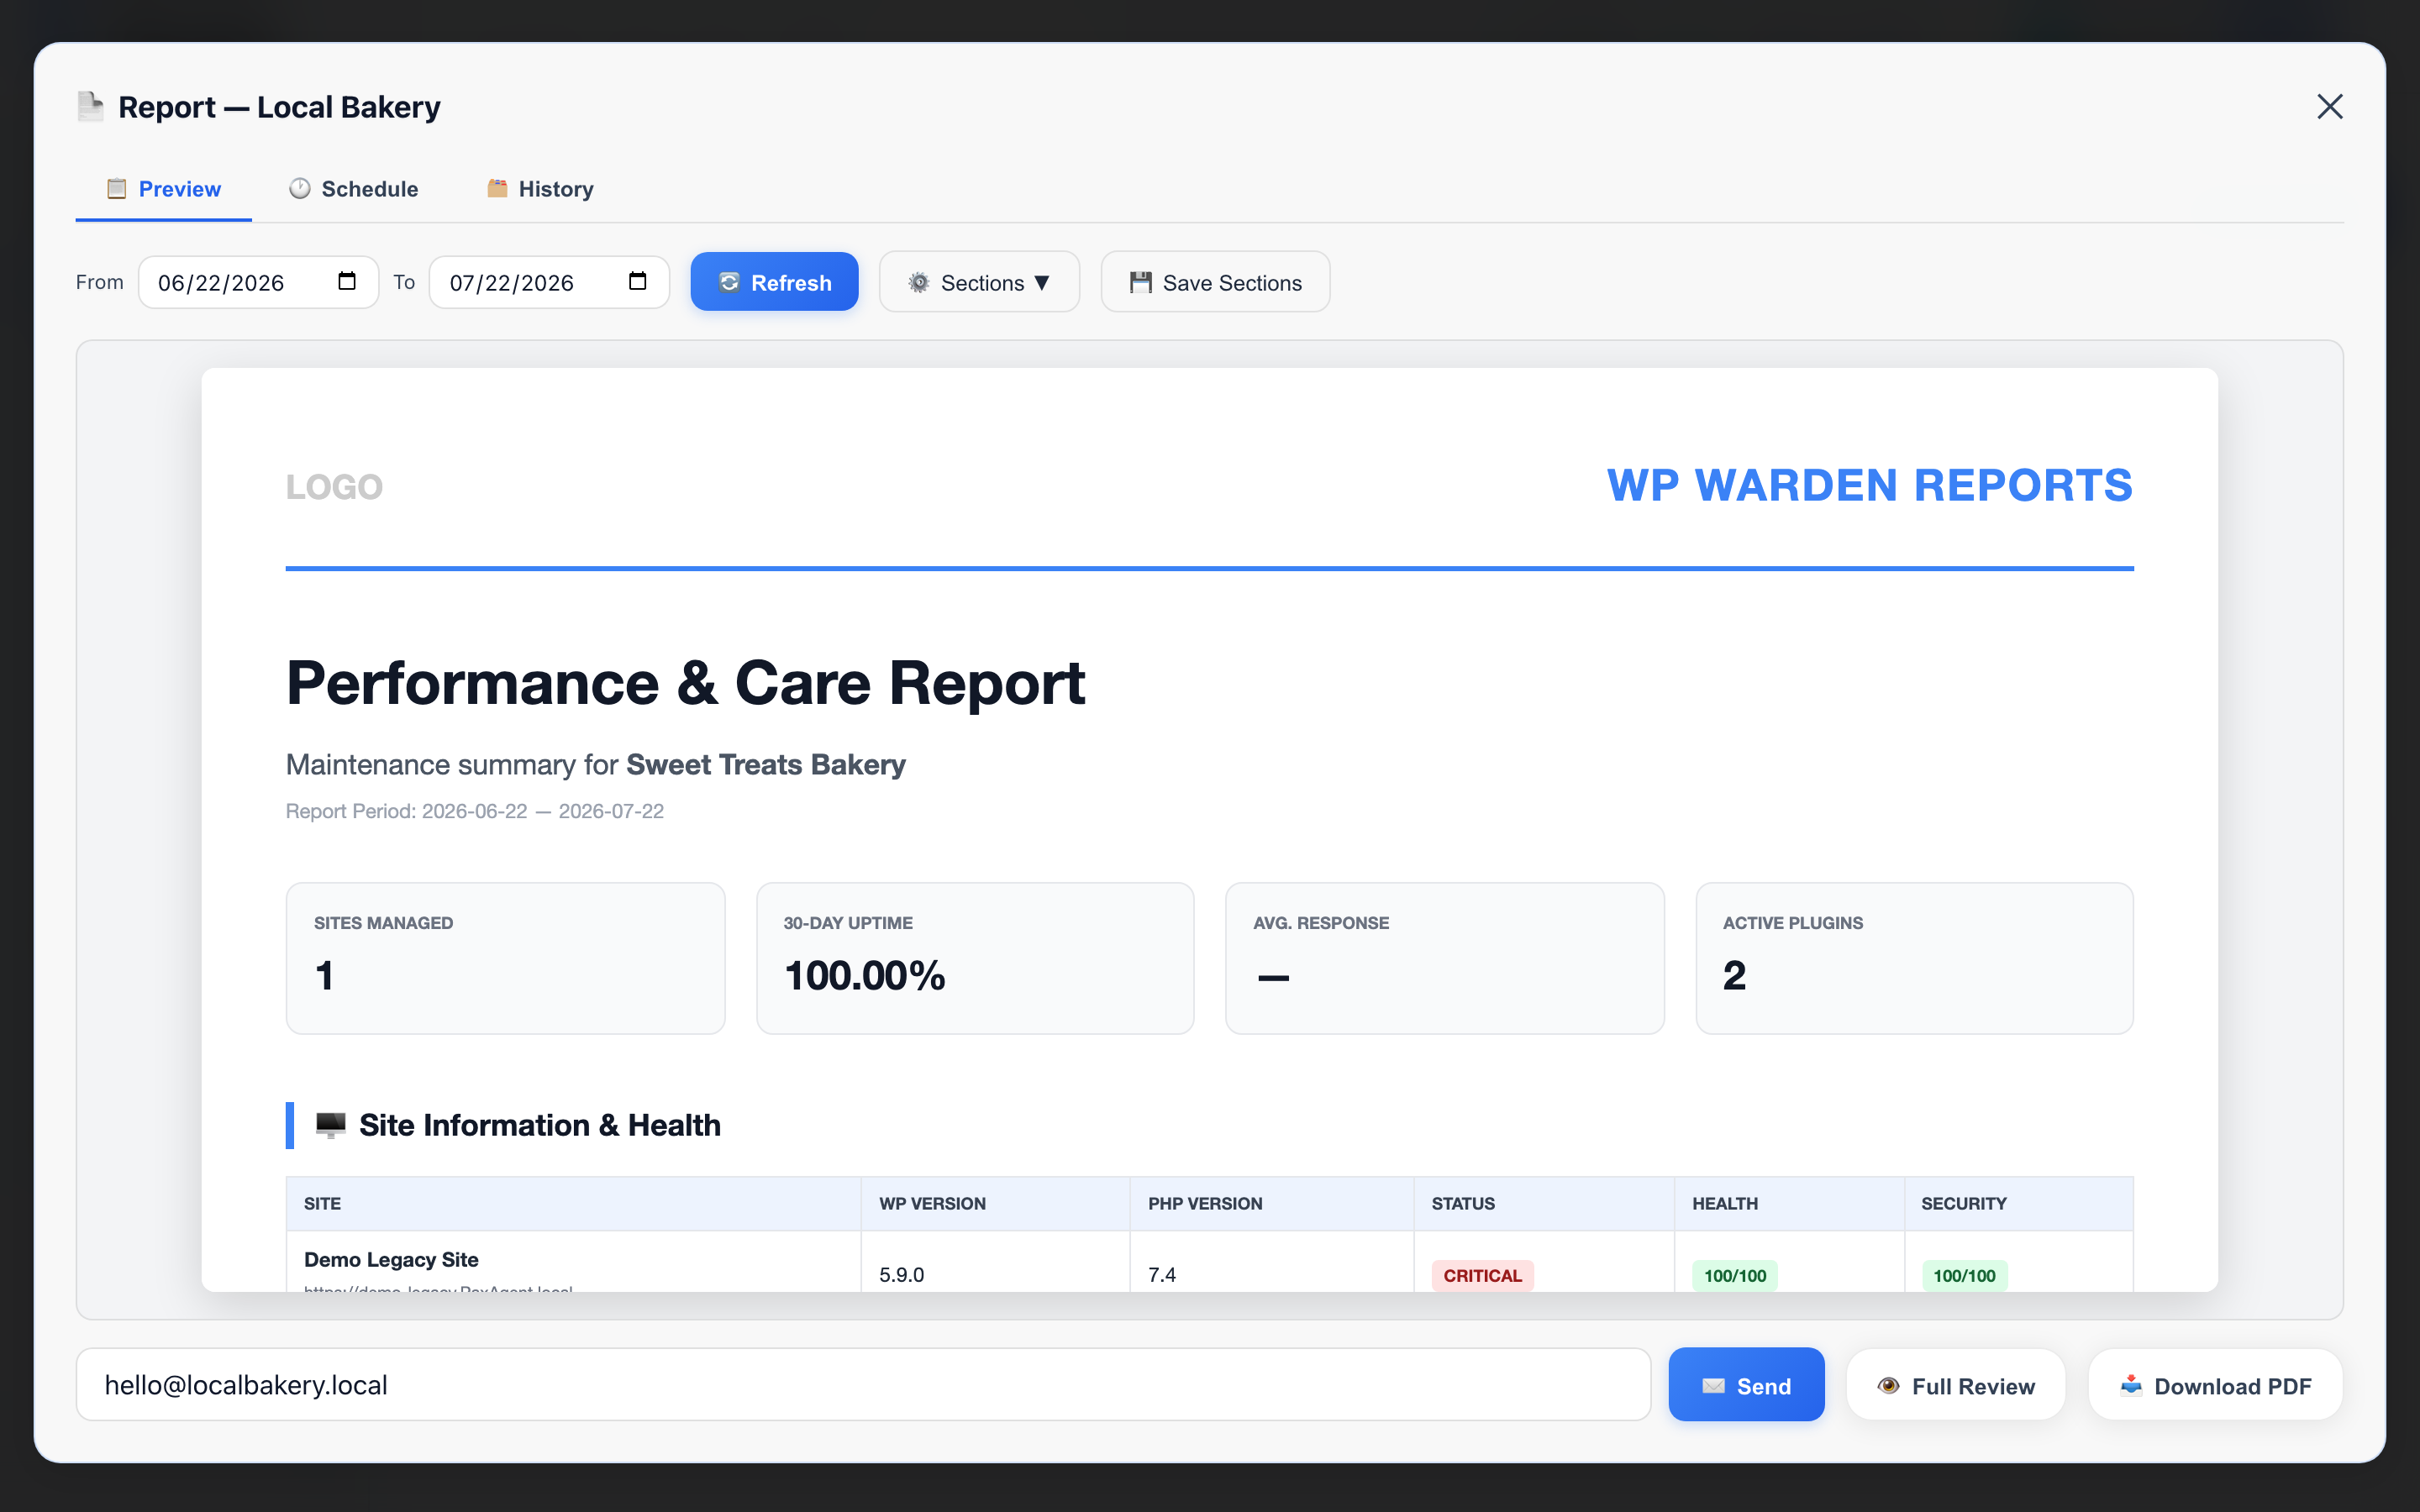 Screenshot: Report modal — Preview tab
The modal’s Preview tab showing the date range picker, section toggles, and the Refresh, Full Review, Download PDF, and Send buttons.
Your brand logo, colors, signature, and tagline are automatically applied to every report. Configure these in Settings → Brand Identity.
The 24 available report sections include: Site Health, Performance, Site Notes, Updates Overview, Theme Inventory, Plugin Inventory, Security Status, Hardening Checklist, Abandoned Software, PHP Errors, Vulnerability Scan, DNS Security Health, File Integrity Scan, Login Security, Backups, Uptime, Cron Health, Broken Links, Recent Content, SEO Rankings, Traffic, Activity Log, Cost Management, and WooCommerce.
A report is a snapshot, not a live view: every section reflects data as of the moment you click Refresh or Download PDF, not afterward. Re-open the report and refresh it if you need current numbers before sending.
How to email a report to a client
DeliverySend a branded PDF report directly from WP Warden to any email address. The report is sent from your configured SMTP server so it arrives from your own domain.
-
Open the Report modal
Go to Clients and click the Report button for the relevant client. -
Configure the report
Set the date range and select sections as described in generating a report. -
Find the recipient email field
In the Preview tab, the recipient email field next to the Send button is pre-filled with the client’s email address. You can change it to send to any address. -
Confirm and send
Click Send. WP Warden generates the PDF, attaches it to a branded email, and sends it immediately. -
Check delivery in the History tab
Switch to the History tab in the Report modal to confirm the report was sent and to track whether the client opened it.
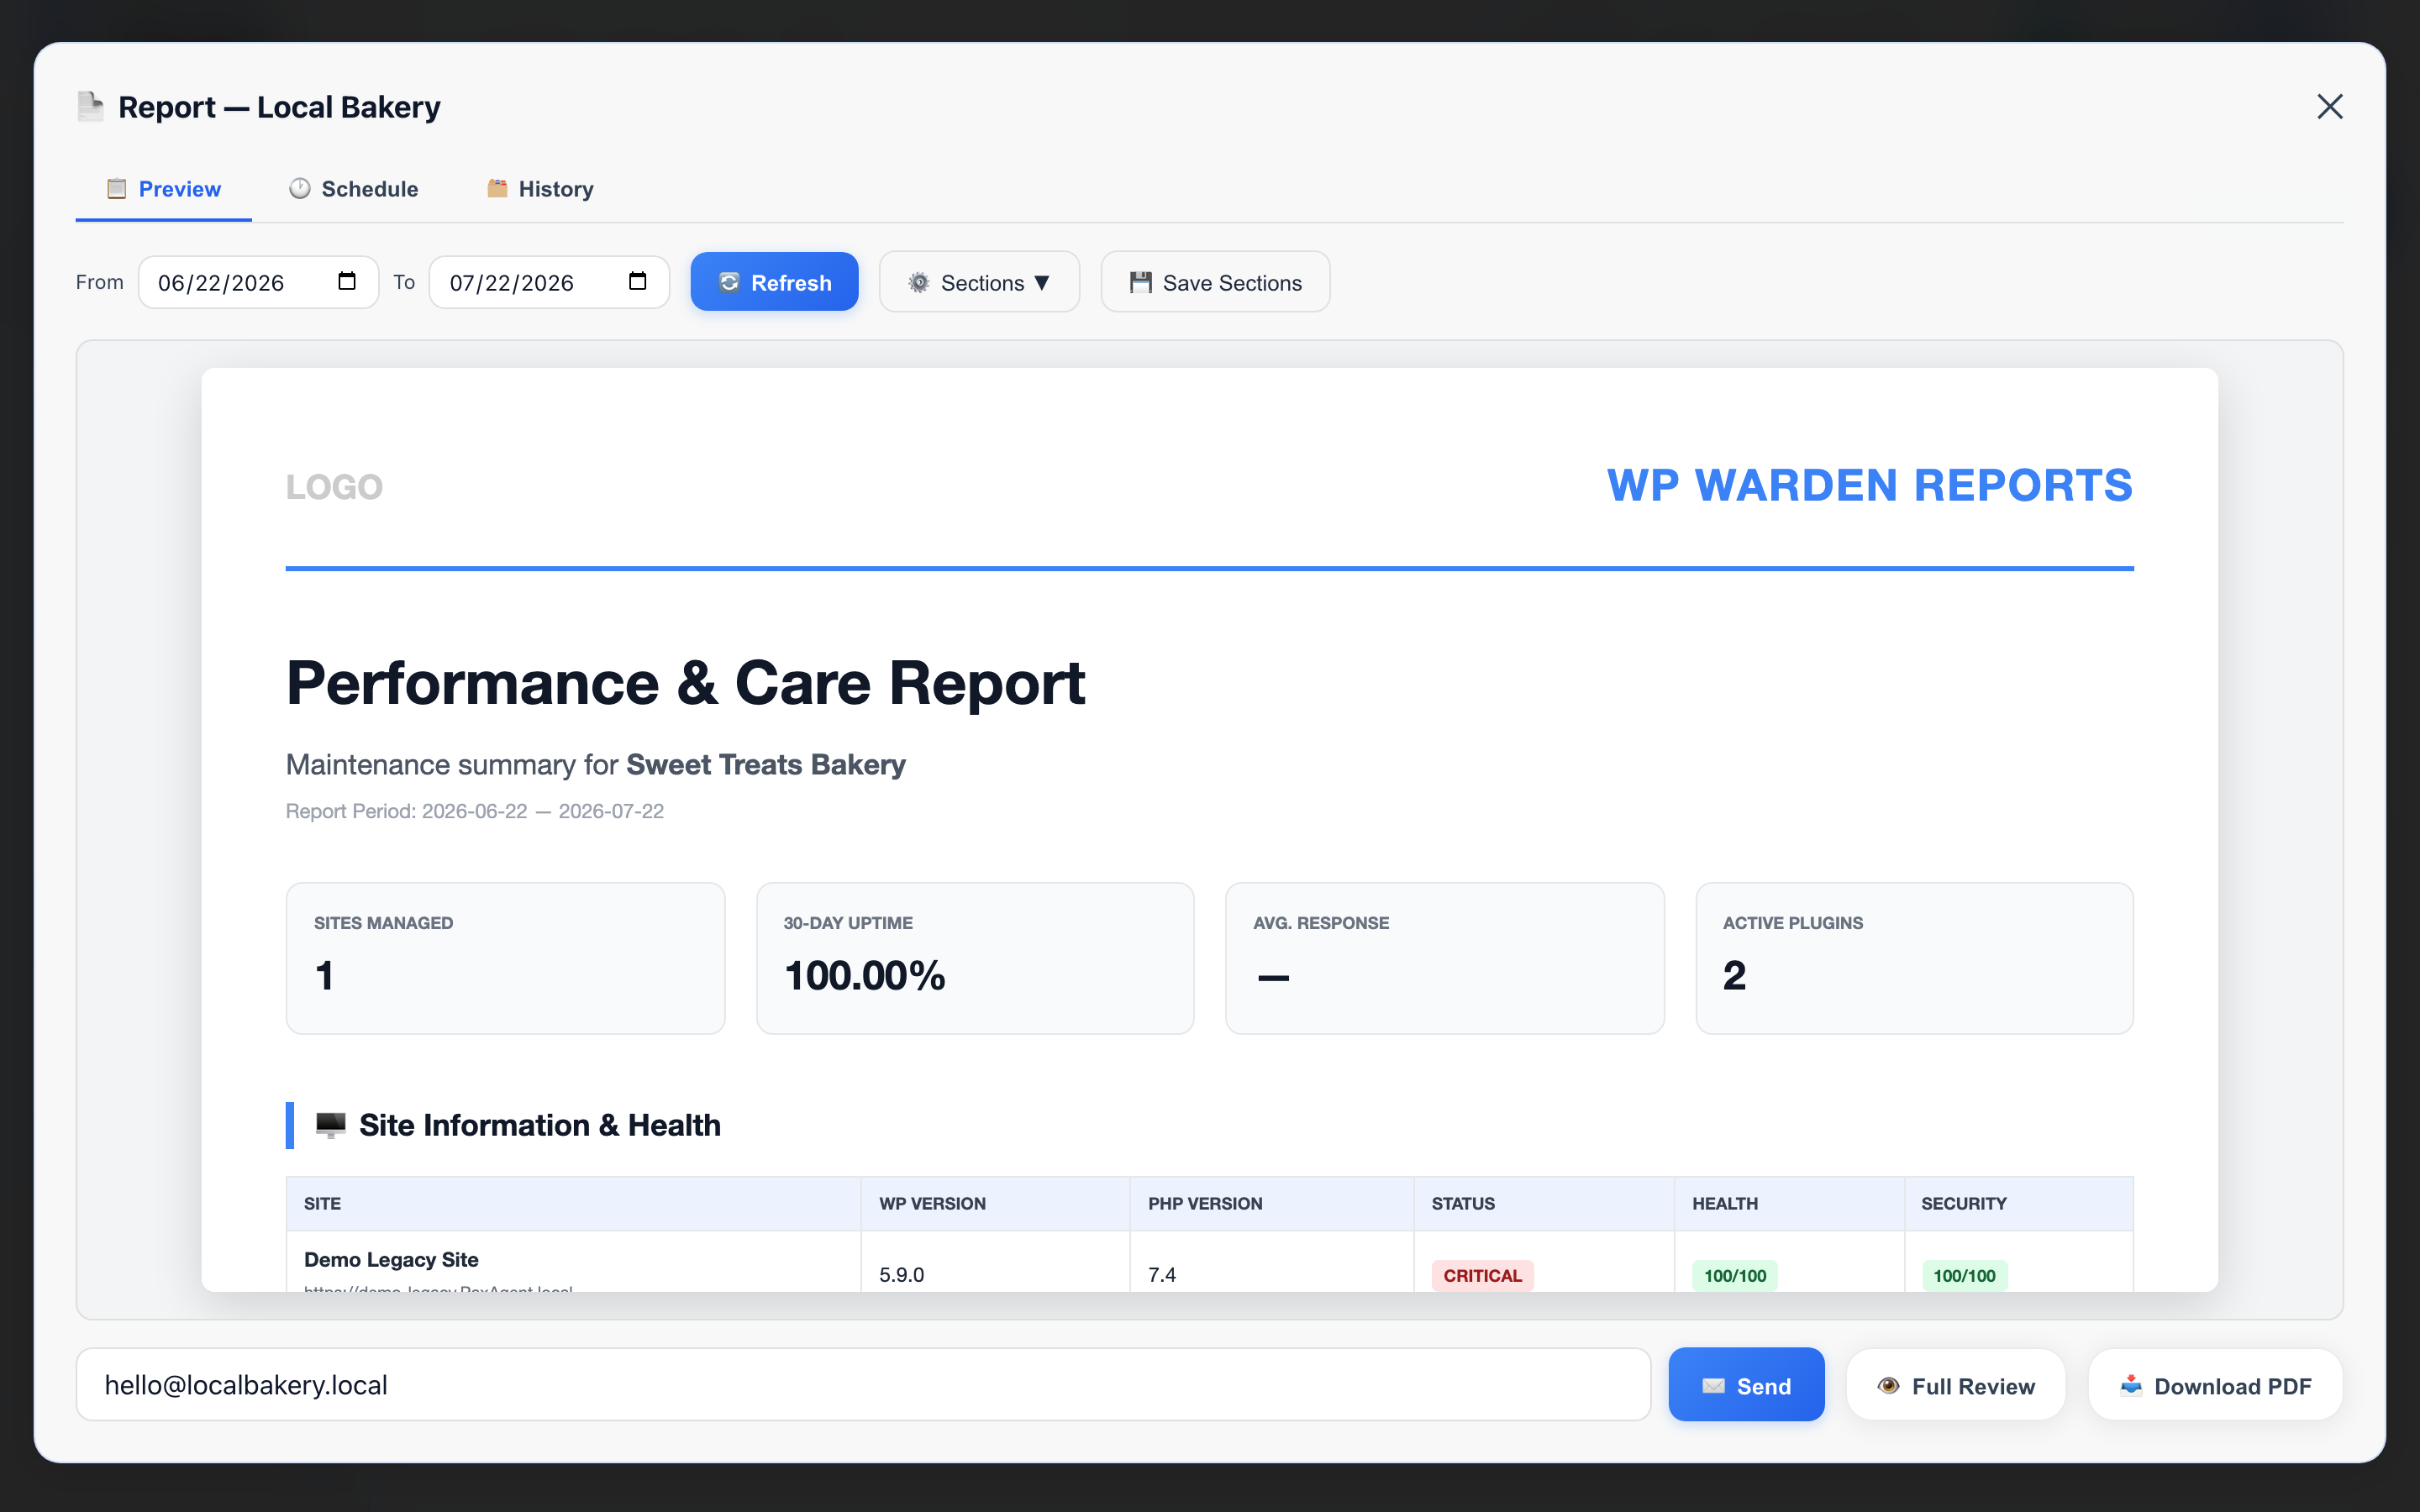 Screenshot: Report modal — Preview tab
The email recipient field and Send button, located in the Preview tab of the report modal.
Email reports require SMTP to be configured in Settings → Email tab. If SMTP is not set up, the email will not be sent.
How to schedule automatic report delivery
AutomationSet up weekly or monthly automated reports so clients receive their maintenance summary on a predictable schedule — hands-free.
-
Open the Report modal for a client
Go to Clients, find the client, and click Report. -
Click the “Schedule” tab
The Schedule tab is next to the Generate tab at the top of the modal. -
Choose a frequency
Select Weekly (covers the past 7 days, then repeats every 7 days from the day you save the schedule) or Monthly (covers the past 30 days, then repeats roughly every month on that same date). Neither option is anchored to a fixed weekday or calendar date — it simply follows the day you first save it. -
Add one or more recipient emails
Add every address the scheduled report should go to — the client’s own email is suggested by default, and you can add as many additional recipients as you need. -
Click “Save Schedule”
The schedule is active immediately. The next report will be sent on the next scheduled date. -
Verify the schedule is active
A confirmation toast shows the computed next send date at the moment you save. There is no persistent schedule badge in the client list — reopen the Schedule tab later if you need to check or change the recipient or frequency.
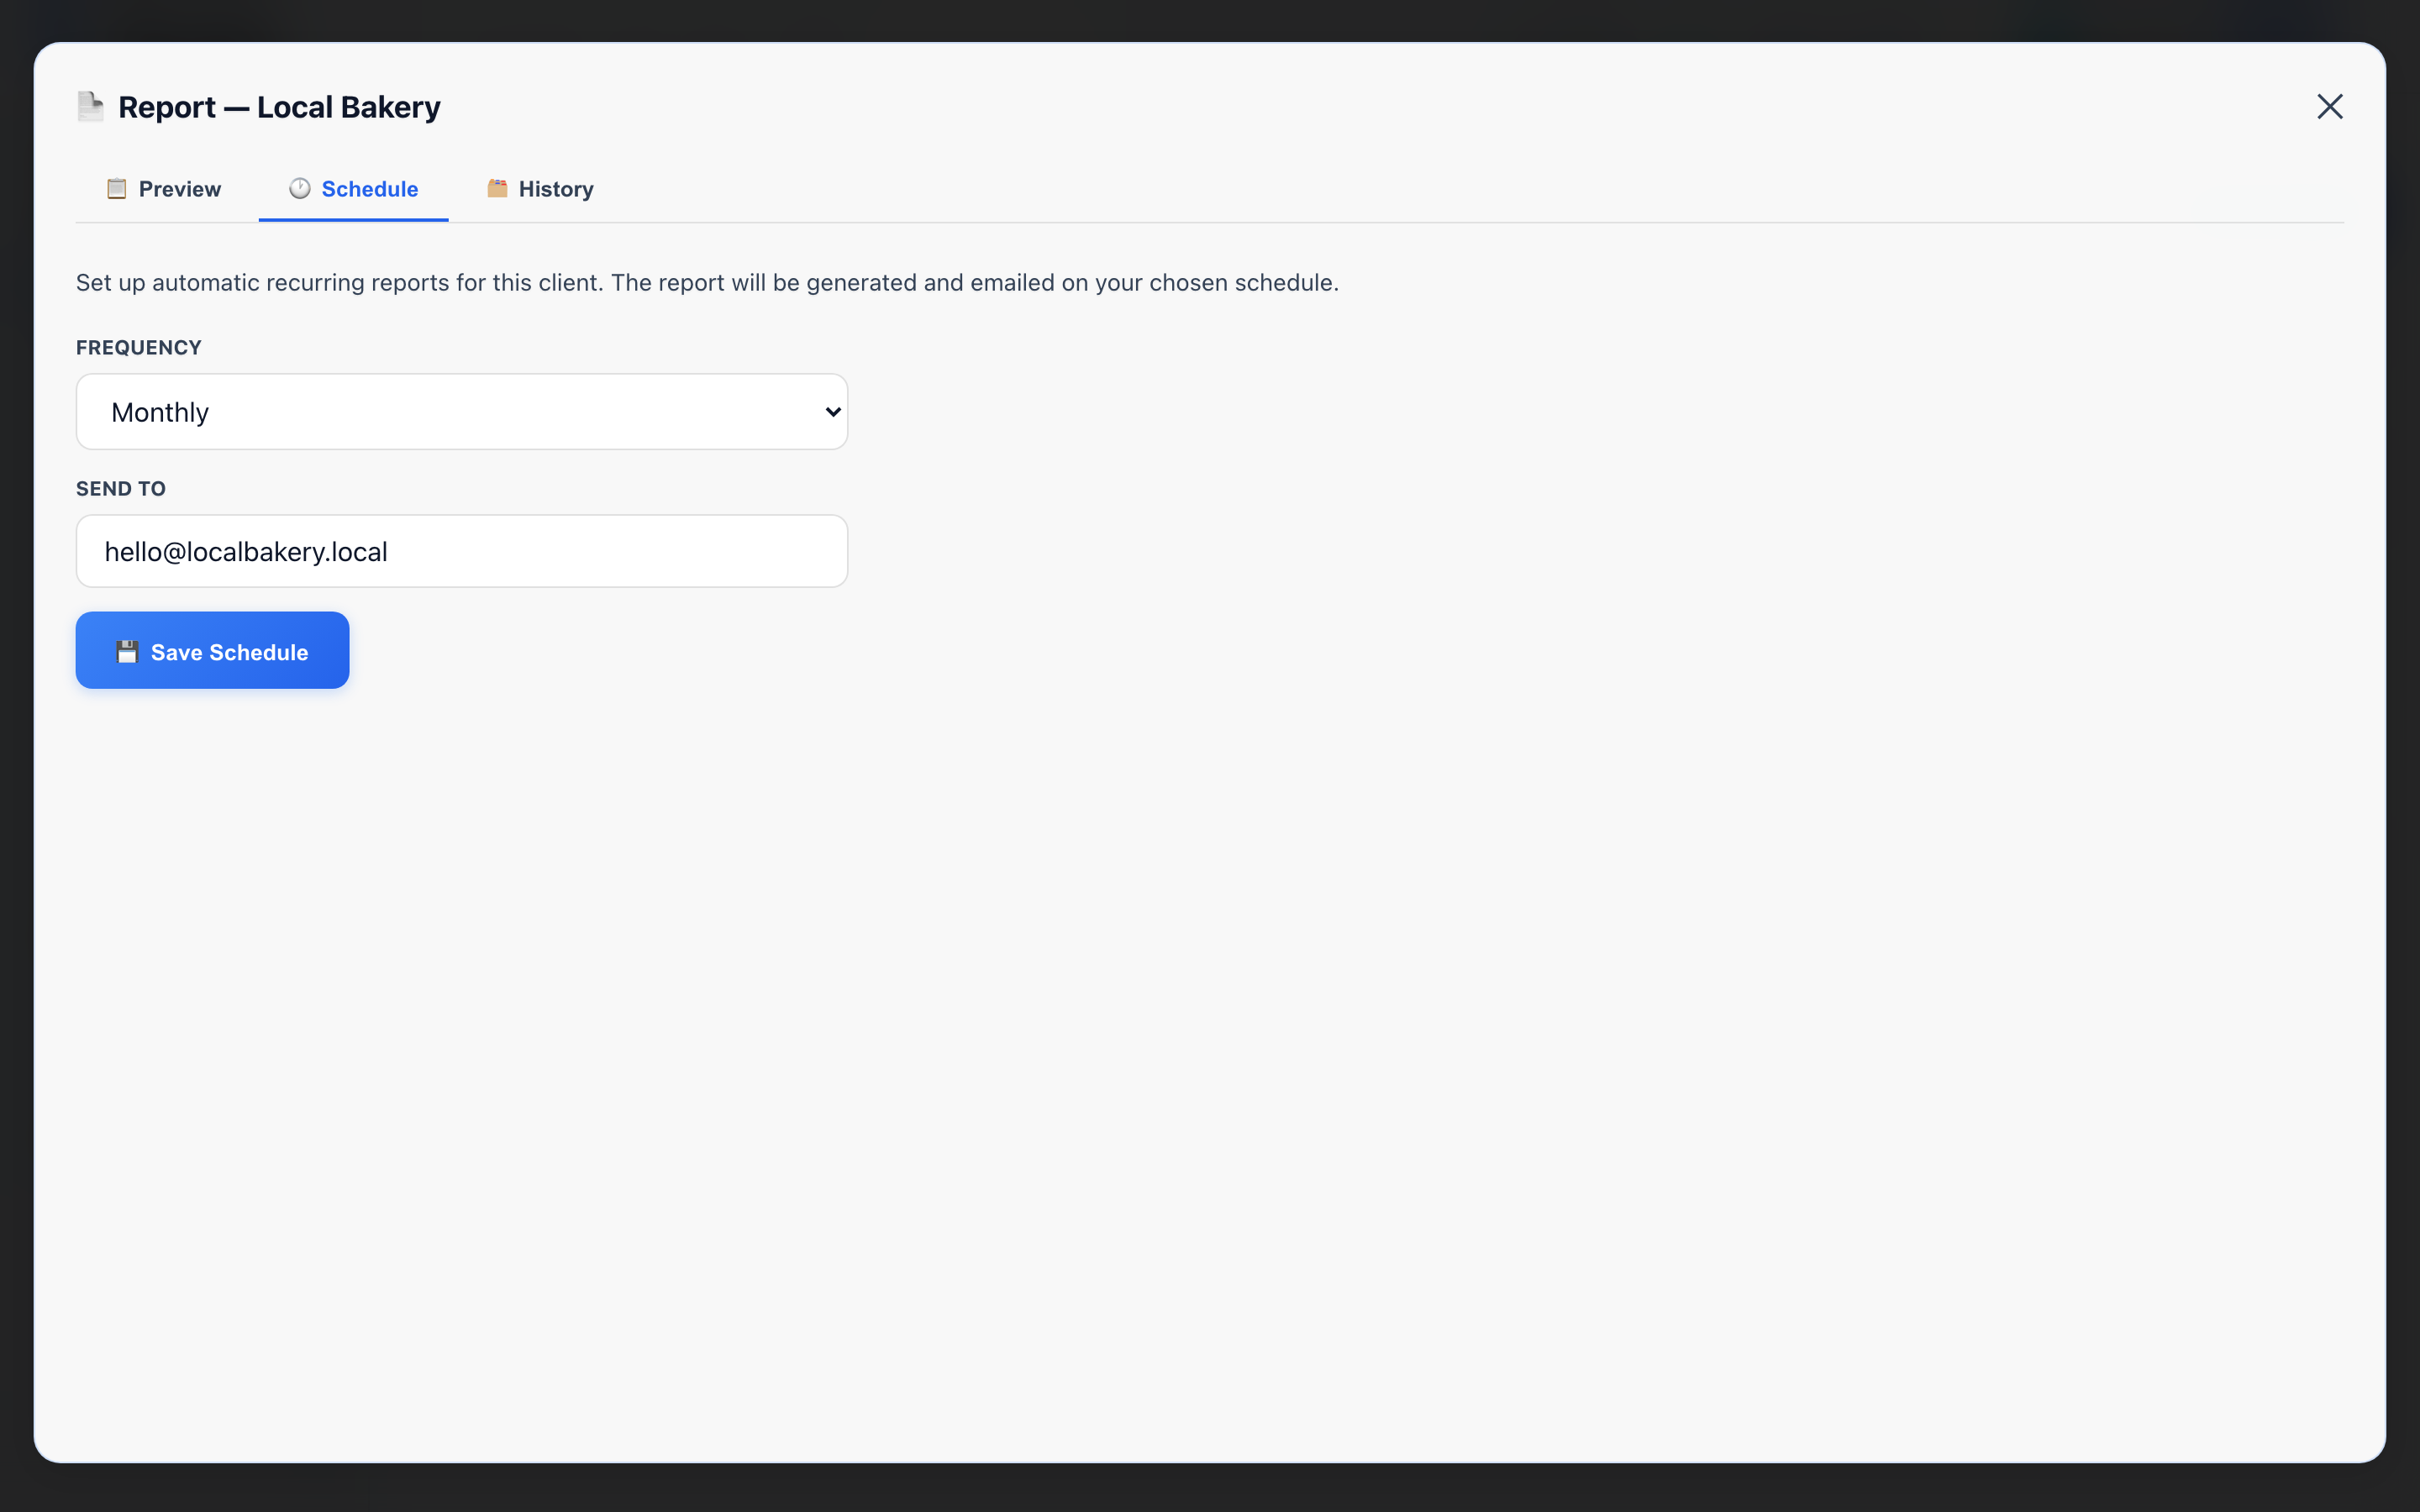 Screenshot: Report modal — Schedule tab
The schedule tab showing frequency selector, recipient email, and Save Schedule button.
You can update a schedule at any time by reopening the Schedule tab and changing the frequency or recipients. To stop it from sending without losing your settings, use the Active/Paused toggle — it keeps the frequency, recipients, and sections in place for when you resume it. Recipient changes take effect on the next scheduled send only — past sends already recorded in the History tab keep the recipient list that was active when they went out.
How to enable the client portal
White-LabelThe client portal is a branded, read-only web page you share with your client. They see the health status, alerts, backups, and activity of their sites without needing a WP Warden login.
-
Open the client’s detail page
Go to Clients and click the client’s name. -
Scroll to “Client Portal”
The Client Portal section is on the client detail page. -
Fill in portal branding
Enter a Portal Label (e.g. “Your Website Dashboard”), an Accent Color (hex color for buttons and highlights), and optionally upload a Portal Logo image. The logo falls back to your global Agency Logo from Settings if left empty. -
Choose which sections the client can see
15 sections are available (Site Status, Alerts, Backups, Activity, Security, Updates, Plugins, Themes, Uptime, Links, SEO, Traffic, WooCommerce, Reports, Support Tickets). Toggle each one on or off. Start with the defaults: Site Status, Alerts, Backups, and Activity are on by default. -
Click “Enable Portal”
A unique shareable URL is generated, for example:https://yourdomain.com/portal/abc123xyz. Copy this link to share with your client. -
Share the portal link with the client
Paste the URL into an email, client onboarding document, or your first report. The client will need to log in with their own viewer account to see the portal — the link alone no longer grants access. Create a viewer login for them under Settings → Team if they don’t already have one — use the same email address you have on file for the client so their portal and login line up. -
Optionally give a client one-click WordPress access
Beyond read-only reporting, you can let a client log directly into WordPress as a specific WordPress user — useful for clients who write their own blog posts. On the client’s detail page, scroll to the WordPress User Access card below Client Portal, pick a WordPress user for each of their sites, and click Save. Their portal will then show an Access [Site Name] button that logs them straight into that exact WordPress account — no WP password is ever shared. What they can do once inside WordPress depends entirely on that account’s own role and permissions, so choose the WordPress user accordingly.
 Screenshot: Client Portal section on the client detail
page
Screenshot: Client Portal section on the client detail
page
The portal branding form (label, color, logo) and the 15 section toggles.
 Screenshot: Client-facing portal — dashboard
view
Screenshot: Client-facing portal — dashboard
view
The white-label portal showing health strip banner, 4 stat cards, site health list, and recent activity feed.
You can update the portal label, color, or logo at any time by clicking Save Settings. The portal URL stays the same — existing bookmarks and client emails remain valid.
Click Disable Portal to immediately revoke a client’s access. The token is invalidated and the URL no longer works.
One-click WordPress access requires the WP Warden plugin to be updated to version 1.6.0 or later on that site. On an older plugin version, the login still works but falls back to logging the client in as the site’s first Administrator instead of the specific user you assigned — update the plugin on that site to have it log in as the exact assigned account.
How to enable support tickets for a client
Client PortalAllow clients to submit and track support requests directly from their white-label portal — no separate helpdesk tool needed.
-
Open the client’s detail page
Go to Clients and click the client’s name. -
Make sure the portal is enabled
The client must have an active portal first. See How to enable the client portal. -
Find the portal sections list
In the Client Portal section, locate the Support Tickets toggle (it is off by default). -
Toggle Support Tickets on
The toggle turns green. The “Support” navigation item now appears in the client’s portal. -
Save the settings
Click Save Settings to apply the change. -
Tell your client they can submit tickets
From their portal, they click Support in the sidebar and fill in a subject and message. Their name and email are pre-filled from the portal but can be edited. -
Receive and reply to tickets
New tickets appear in Tickets in the WP Warden sidebar. Click a ticket to open the thread and add a reply. The client receives an email notification using your white-label branding whenever you reply.
 Screenshot: Support Tickets section in the client
portal
Screenshot: Support Tickets section in the client
portal
The portal’s Support page showing open ticket count, ticket list, and the bubble-chat thread view when a ticket is clicked.
Clients are rate-limited to 5 ticket submissions per hour per portal to prevent spam.
Reply notifications use the same SMTP configuration as emailed and scheduled reports. If SMTP isn’t set up under Settings → Email, your reply still saves to the ticket thread but the client won’t be emailed about it — they’d only see it by logging back into the portal.
How to track report open and engagement
AnalyticsEvery tracked report email sent through WP Warden includes a tracking pixel that records when the client opens it and whether they clicked to download the PDF — and a visible notice in the email itself saying so, with a one-click opt-out link.
-
Open the Report modal for a client
Go to Clients and click Report for the client. -
Click the “History” tab
Every report you have sent for this client is listed here in chronological order. -
Check the engagement columns
For each report you will see: Open Status (opened / not opened), First Opened (relative time, e.g. “2h ago”), Open Count (total number of opens), and PDF Downloads. -
Interpret the data
If a report shows “Not Opened” after several days, consider sending a follow-up. If a client is regularly opening reports, they are engaged and may be a good upsell candidate.
 Screenshot: Report History tab showing engagement
data
Screenshot: Report History tab showing engagement
data
The history table with columns for date sent, recipient, open status badge, first opened time, open count, and PDF download count.
There’s no fleet-wide engagement scoring dashboard — check each client’s own Report History tab individually to see who’s opening their reports and who isn’t.
The tracking pixel is a standard industry practice. It embeds a 1×1 transparent image in the email, alongside a plain-language disclosure and an opt-out link that the recipient can click at any time. When the client’s email client loads images, the open is recorded. Some email clients block image loading by default, in which case opens may be under-counted. If a recipient opts out, every future email you send them — including reports — goes out without a pixel, regardless of your own tracking setting.