How to configure SMTP outbound email
EssentialBy default, WP Warden sends reports and alerts from
a system mail server. Configuring your
own SMTP ensures emails arrive from your own domain (e.g. reports@youragency.com) with better
deliverability and full white-label appearance.
-
Go to Settings → Email tab
Click Settings in the sidebar, then select the Email tab at the top. -
Find the “Outbound Mail (SMTP)” section
This section is at the top of the Email tab. -
Fill in your SMTP credentials
- SMTP Host — your mail server hostname (e.g.
smtp.gmail.com) - SMTP Port —
587for TLS,465for SSL,25for unencrypted - Username — the email address or login (e.g.
reports@youragency.com) - Password — use the show/hide toggle to check your entry
- From Email — the address that appears as the sender
- From Name — the display name in email inboxes (e.g. “WP Warden Agency”)
- SMTP Host — your mail server hostname (e.g.
-
Click Save
The Save button at the top is only enabled when there are unsaved changes. Click it to save your SMTP settings. -
Test the connection
After saving, click Send Test Email. WP Warden sends a test email to your logged-in account’s email address. A green ✅ badge confirms success; a red ❌ shows the error message.
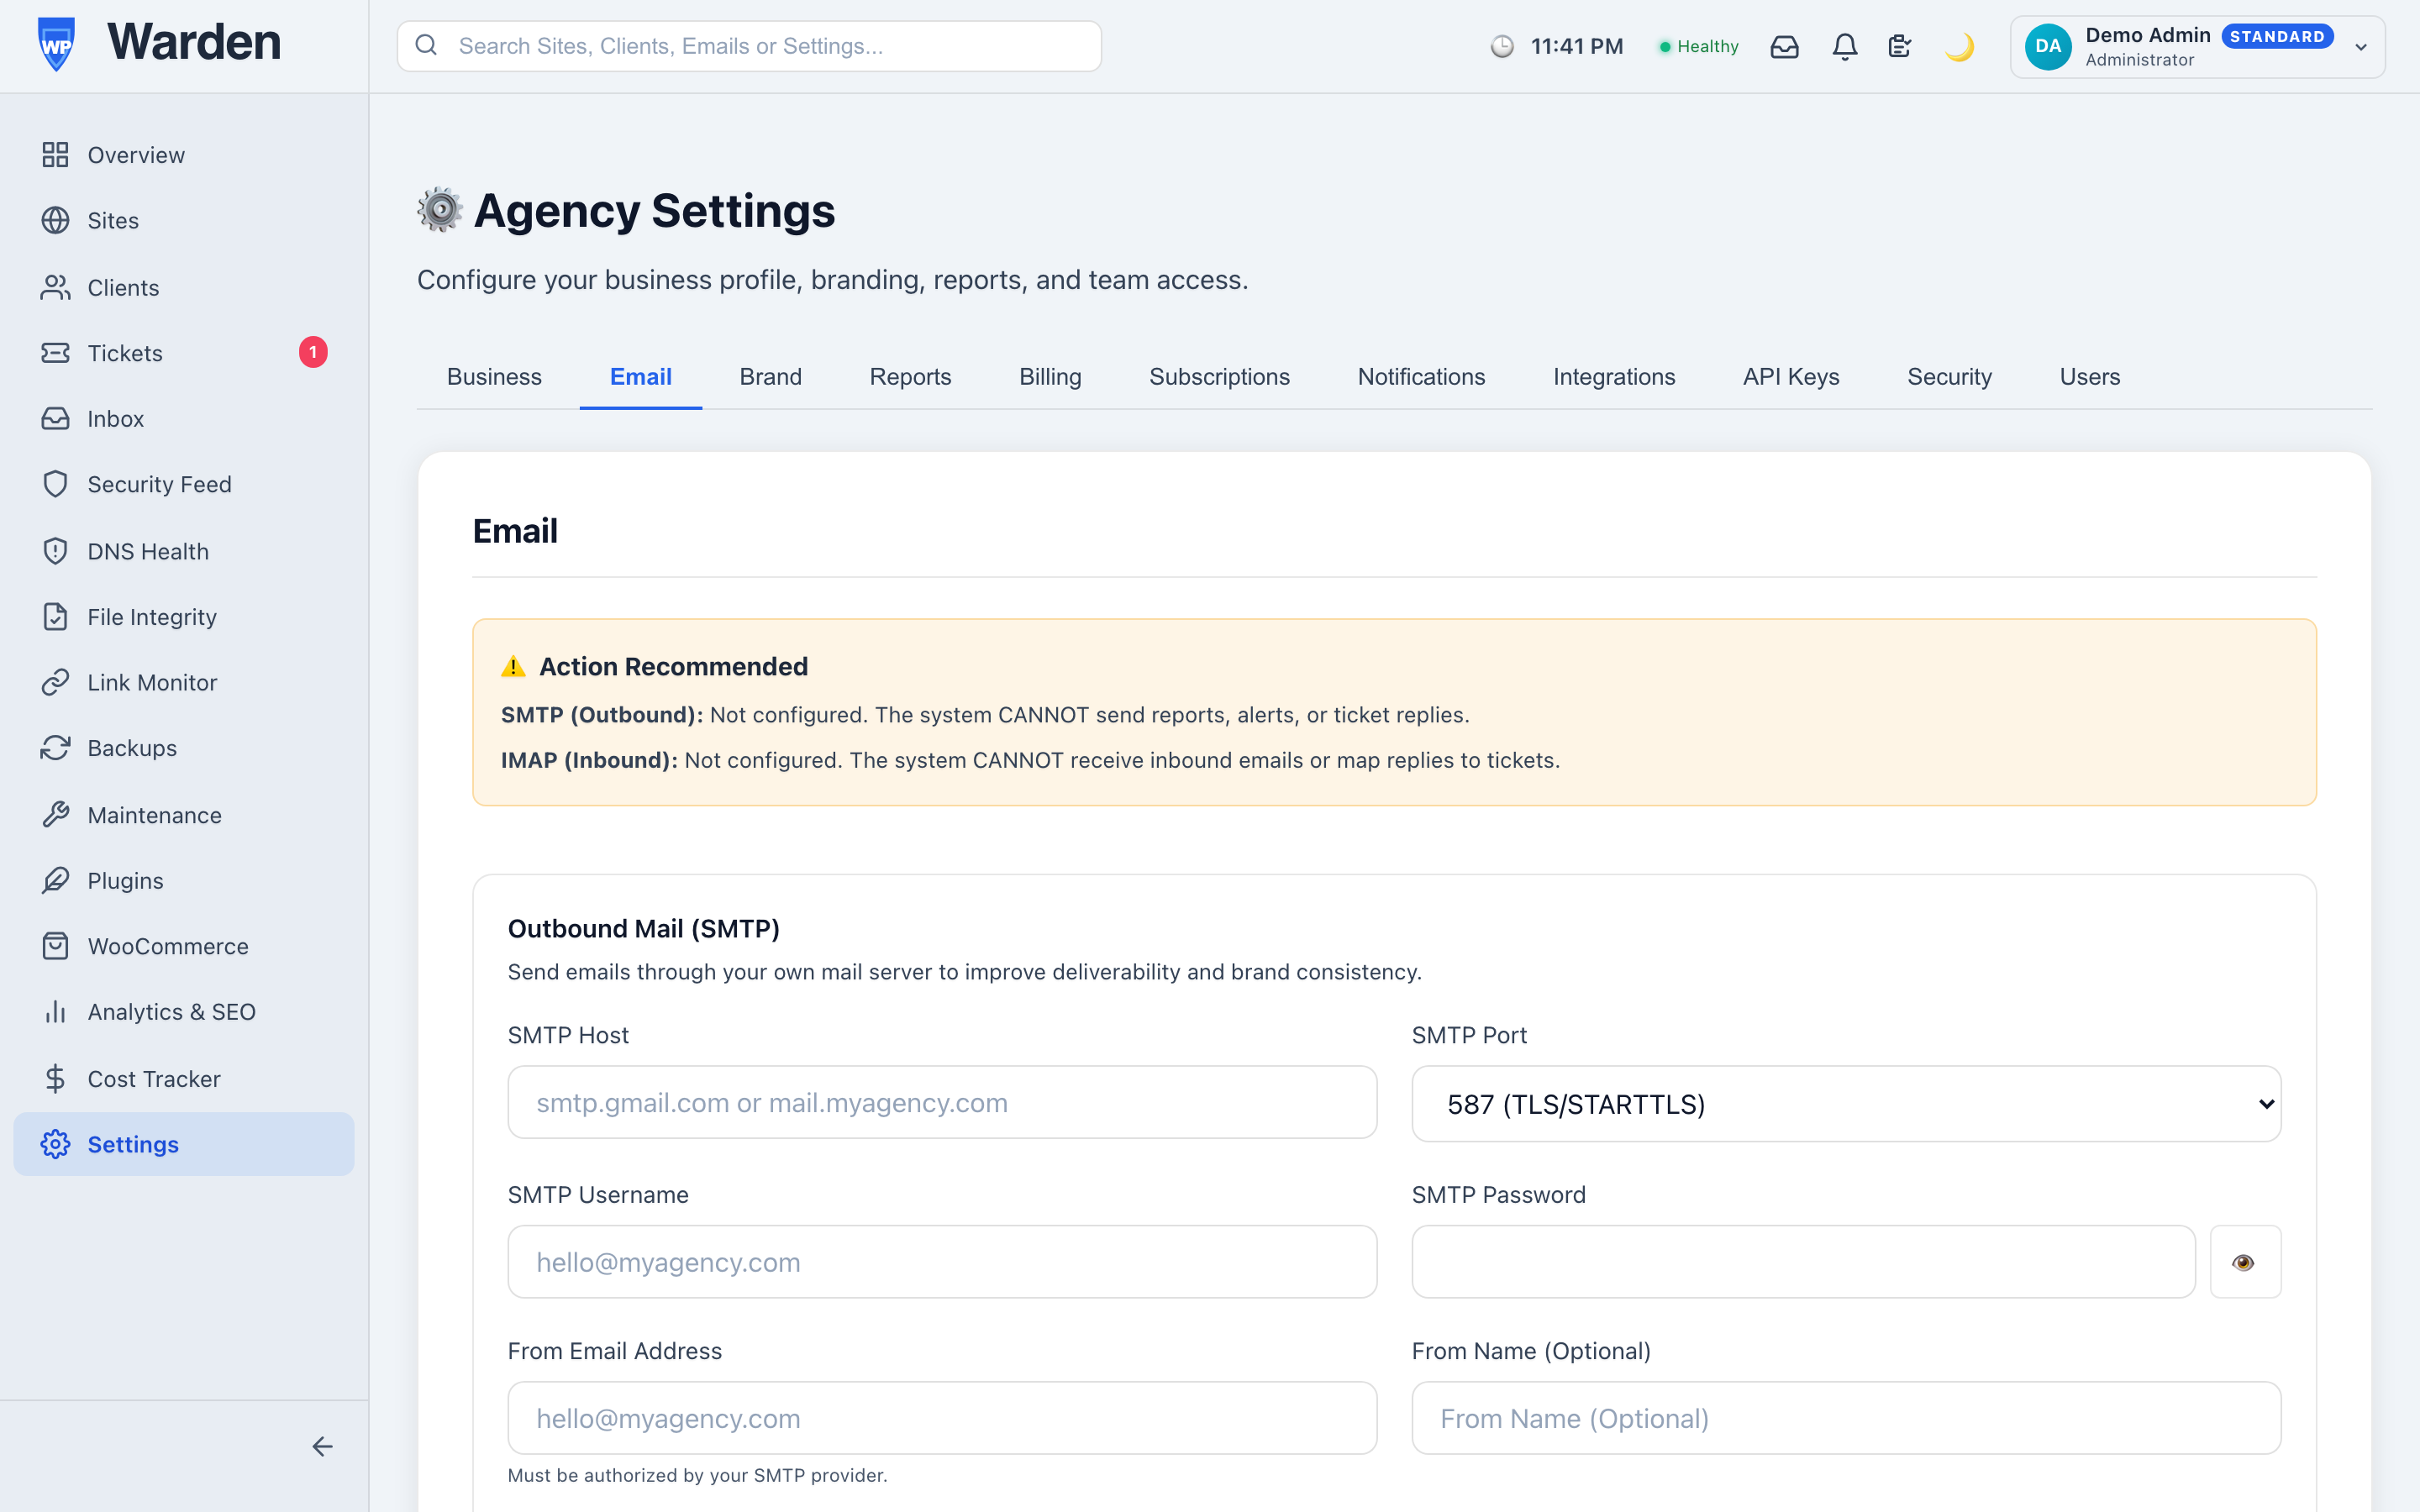 Screenshot: Settings → Email tab — SMTP section
The SMTP configuration form with all fields filled in, and the Send Test Email button.
Common providers: Gmail →
smtp.gmail.com:587 (use an App Password if 2FA is
on). SendGrid → smtp.sendgrid.net:587 (use your API key as the password). Mailgun →
smtp.mailgun.org:587. Amazon SES → email-smtp.us-east-1.amazonaws.com:587.
The Send Test Email button is automatically disabled when you have unsaved changes — this prevents testing a configuration that hasn’t been saved yet. Always save first, then test.
Getting a password/API key for the boxes above happens on the provider’s own side, not in WP Warden: Google — “Sign in with app passwords” · Microsoft 365 — “Enable or disable SMTP AUTH” · SendGrid — “Getting started with SMTP” · Mailgun — “Send via SMTP” · Amazon SES — “Obtaining SMTP credentials”. Gmail and Microsoft 365 both block plain-password SMTP login by default — you need an app password (Gmail) or SMTP AUTH explicitly enabled (Microsoft 365) instead of your normal login password.
How to enable two-factor authentication (2FA)
SecurityProtect your WP Warden account with a second verification step. WP Warden supports TOTP authenticator apps (Google Authenticator, Authy, 1Password) and email-based one-time codes.
-
Open your Profile
Click your name or avatar in the top-right corner of the dashboard, then select My Profile from the dropdown menu. -
Click the Security tab
On your Profile page, click the Security tab. This tab only appears on your own profile — not when viewing a teammate’s profile. -
Choose your method
- Authenticator App (TOTP) — most secure, and selected by default. Scan a QR code with your authenticator app and enter the 6-digit time-based code. Any TOTP app works — if you don’t already have one, get Google Authenticator, Authy, or use 1Password’s one-time passwords if you’re already a 1Password user.
- Email Verification — simpler. A one-time code is sent to your registered email on each login. Requires your agency’s SMTP to be configured.
-
Verify your method
For Authenticator App: click Setup 2FA to generate a QR code, scan it with your app (or enter the manual key shown below it), then enter the 6-digit code it displays. For Email Verification: click Send Email Code, then enter the code you receive. -
Click Enable 2FA and save your backup codes
Click Enable 2FA. WP Warden generates 8 single-use backup codes. Copy and store these in a safe place (password manager recommended). If you lose access to your authenticator or email, these codes let you log in. -
Complete setup
2FA is now active on your account. Your next login will require the second factor.
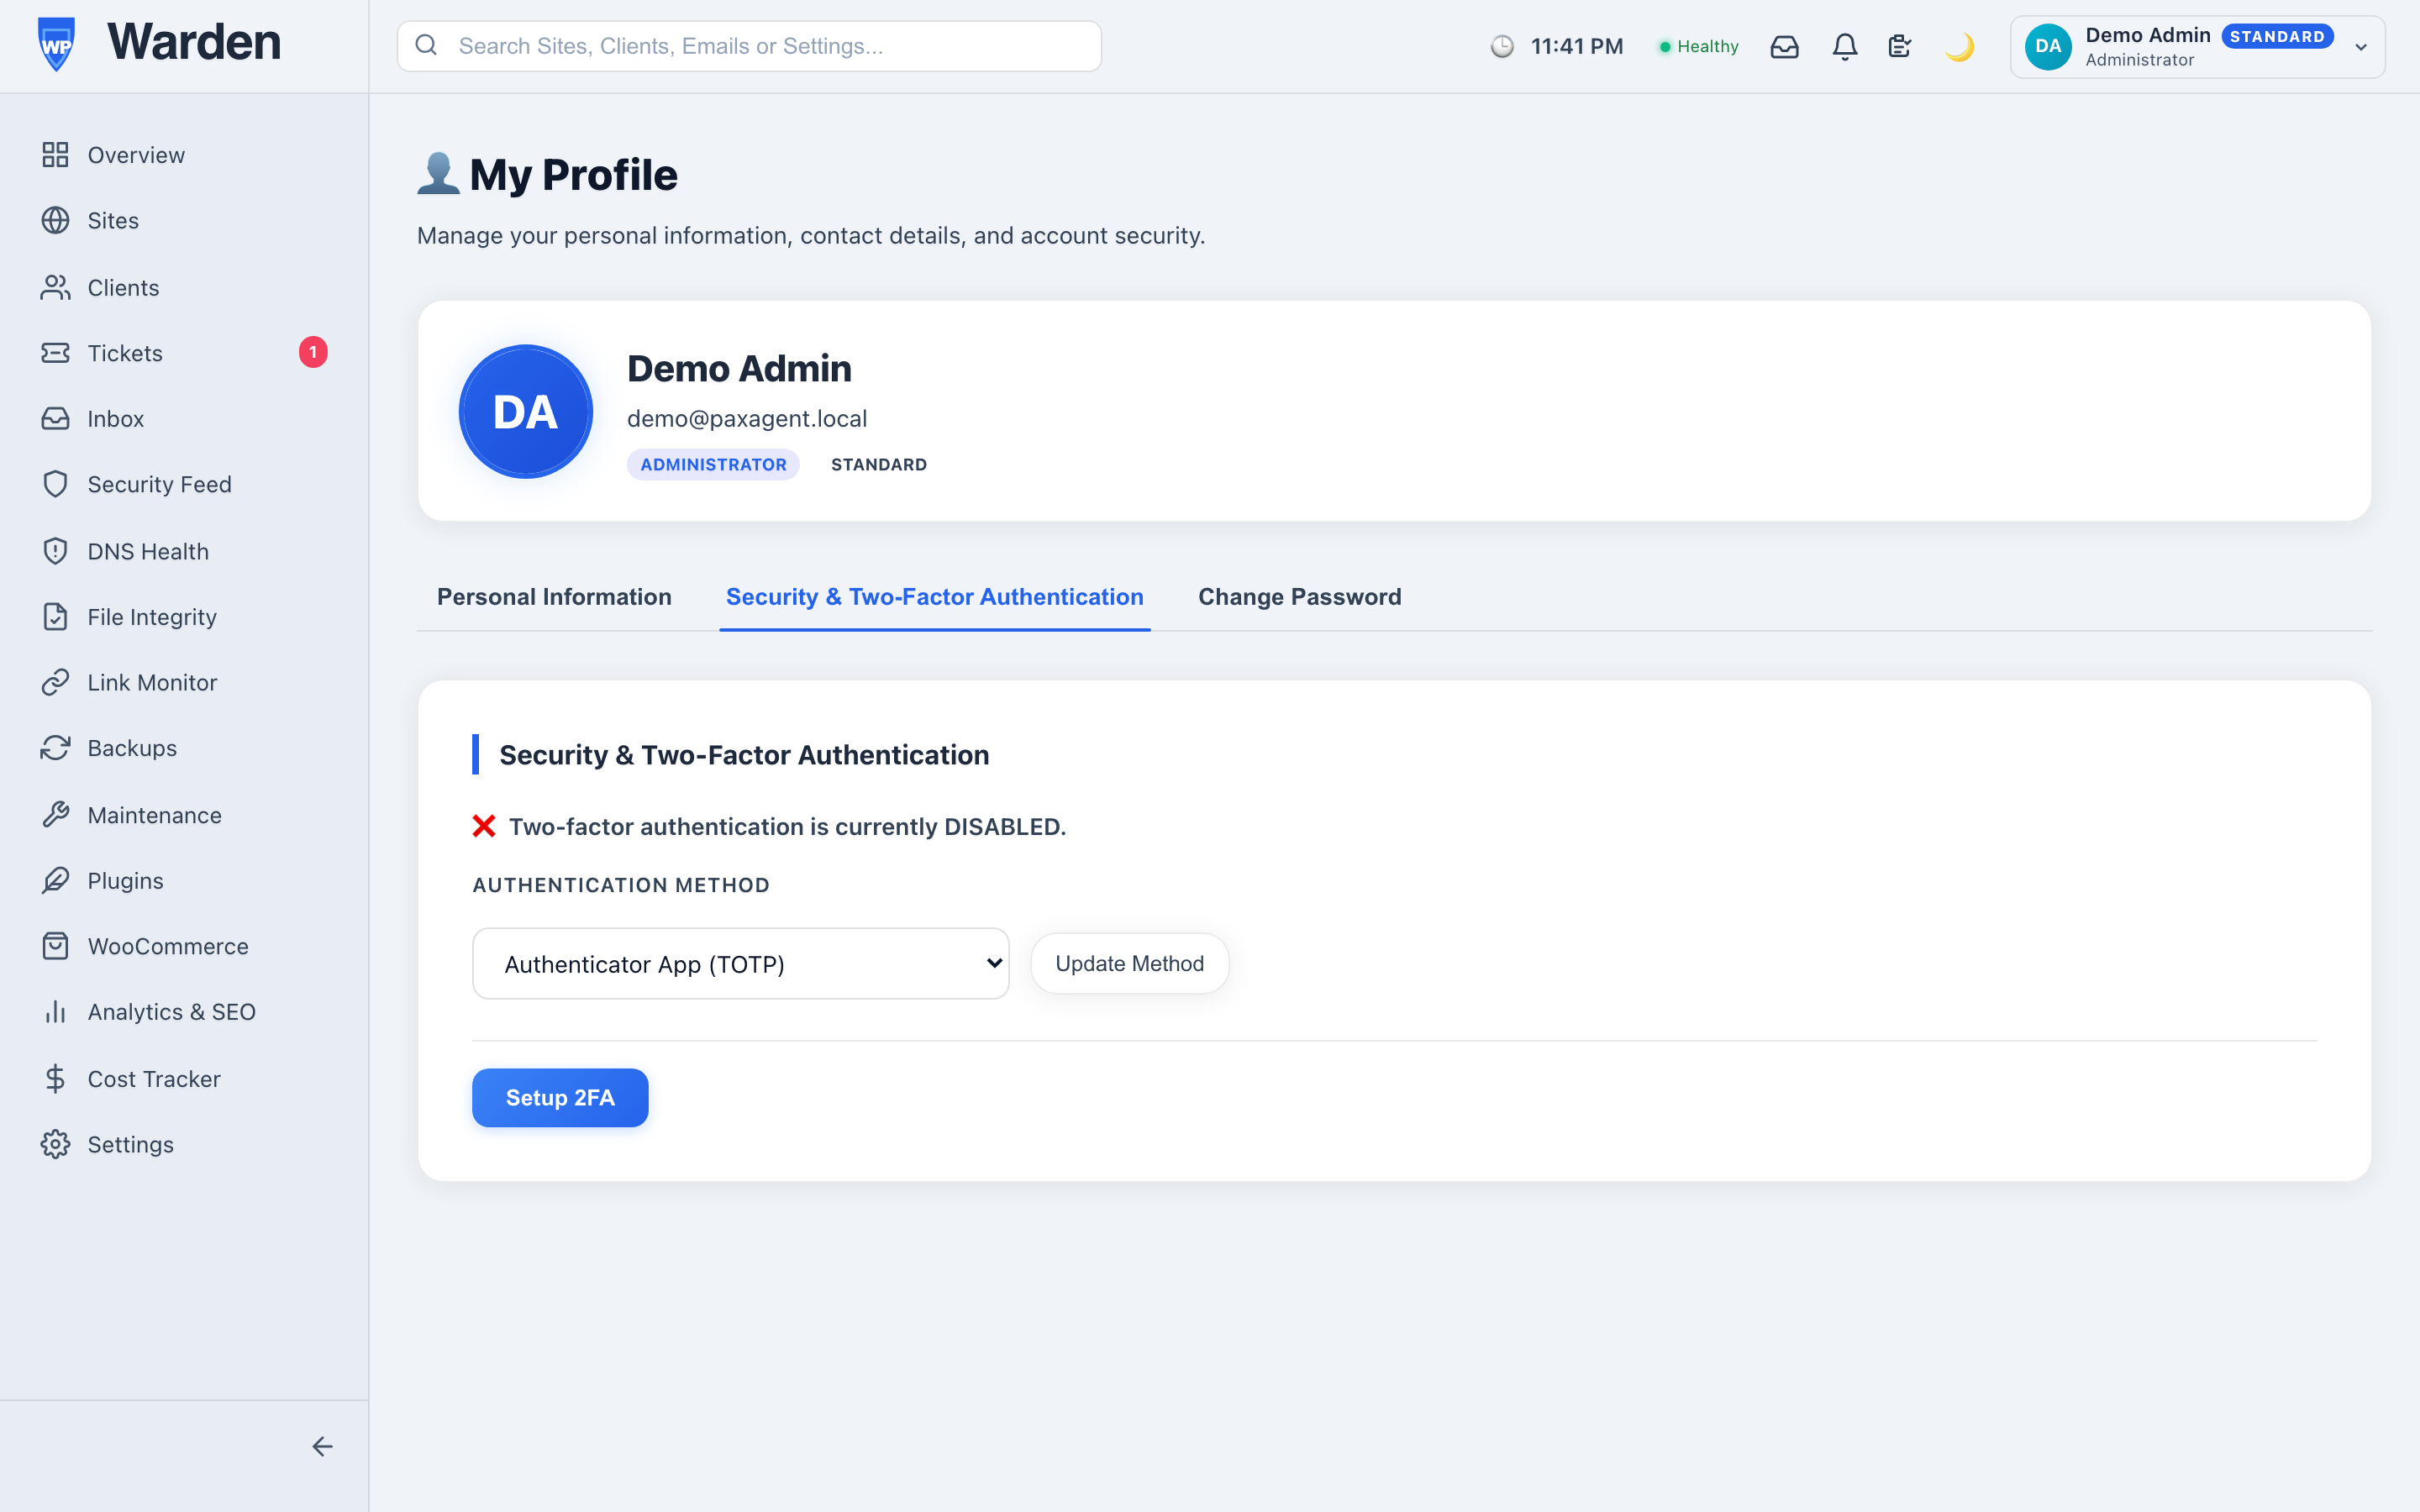 Screenshot: Profile → Security tab — 2FA setup
The 2FA setup showing the QR code, the confirmation code entry field, and the generated backup codes.
If you switch phones or lose your authenticator, use a backup code to log in. Then go to your Profile → Security tab and regenerate new backup codes (old codes are invalidated immediately).
Administrators can see each team member’s 2FA status in Settings → Users, but there’s no admin-triggered way to remotely disable or reset a user’s 2FA — a locked-out user must use one of their saved backup codes to regain access.
How to customize brand identity
White-LabelWP Warden is fully white-labeled. Configure your logo, colors, signature, and messaging so every report, email, and client portal shows only your agency’s brand.
-
Go to Settings → Brand tab
Click Settings in the sidebar, then select the Brand tab. -
Set your brand core
- Brand Name — shown in reports, emails, and the client portal header
- Brand Color — hex color for report headings, portal accent, and email buttons
- Agency Logo — your agency logo; appears in report headers and portals
- Report Tagline — short phrase under your logo (e.g. “Keeping your website healthy”)
-
Use a tone preset (optional)
Click one of the four preset buttons to instantly apply a brand color + matching tagline suggestion: Corporate Blue, Standard Indigo, Professional Emerald, or Bold Orange. -
Configure your email signature
- Profile Photo URL — optional headshot photo URL
- LinkedIn / Twitter / Website — clickable links in the signature
Signature name, title, and a closing message are configured separately, under Settings → Reports tab → Report Signature.
-
Configure report settings (optional)
Toggle the Agency Cover Page on/off (Dark or Light style). Add a Watermark text. Configure the email sender display name and reply-to address. Add a Social Proof footer (badge image, testimonial quote). Enter an Unsubscribe URL for GDPR compliance. -
Save
Click Save in the header. Changes apply to all future reports and portal interactions immediately.
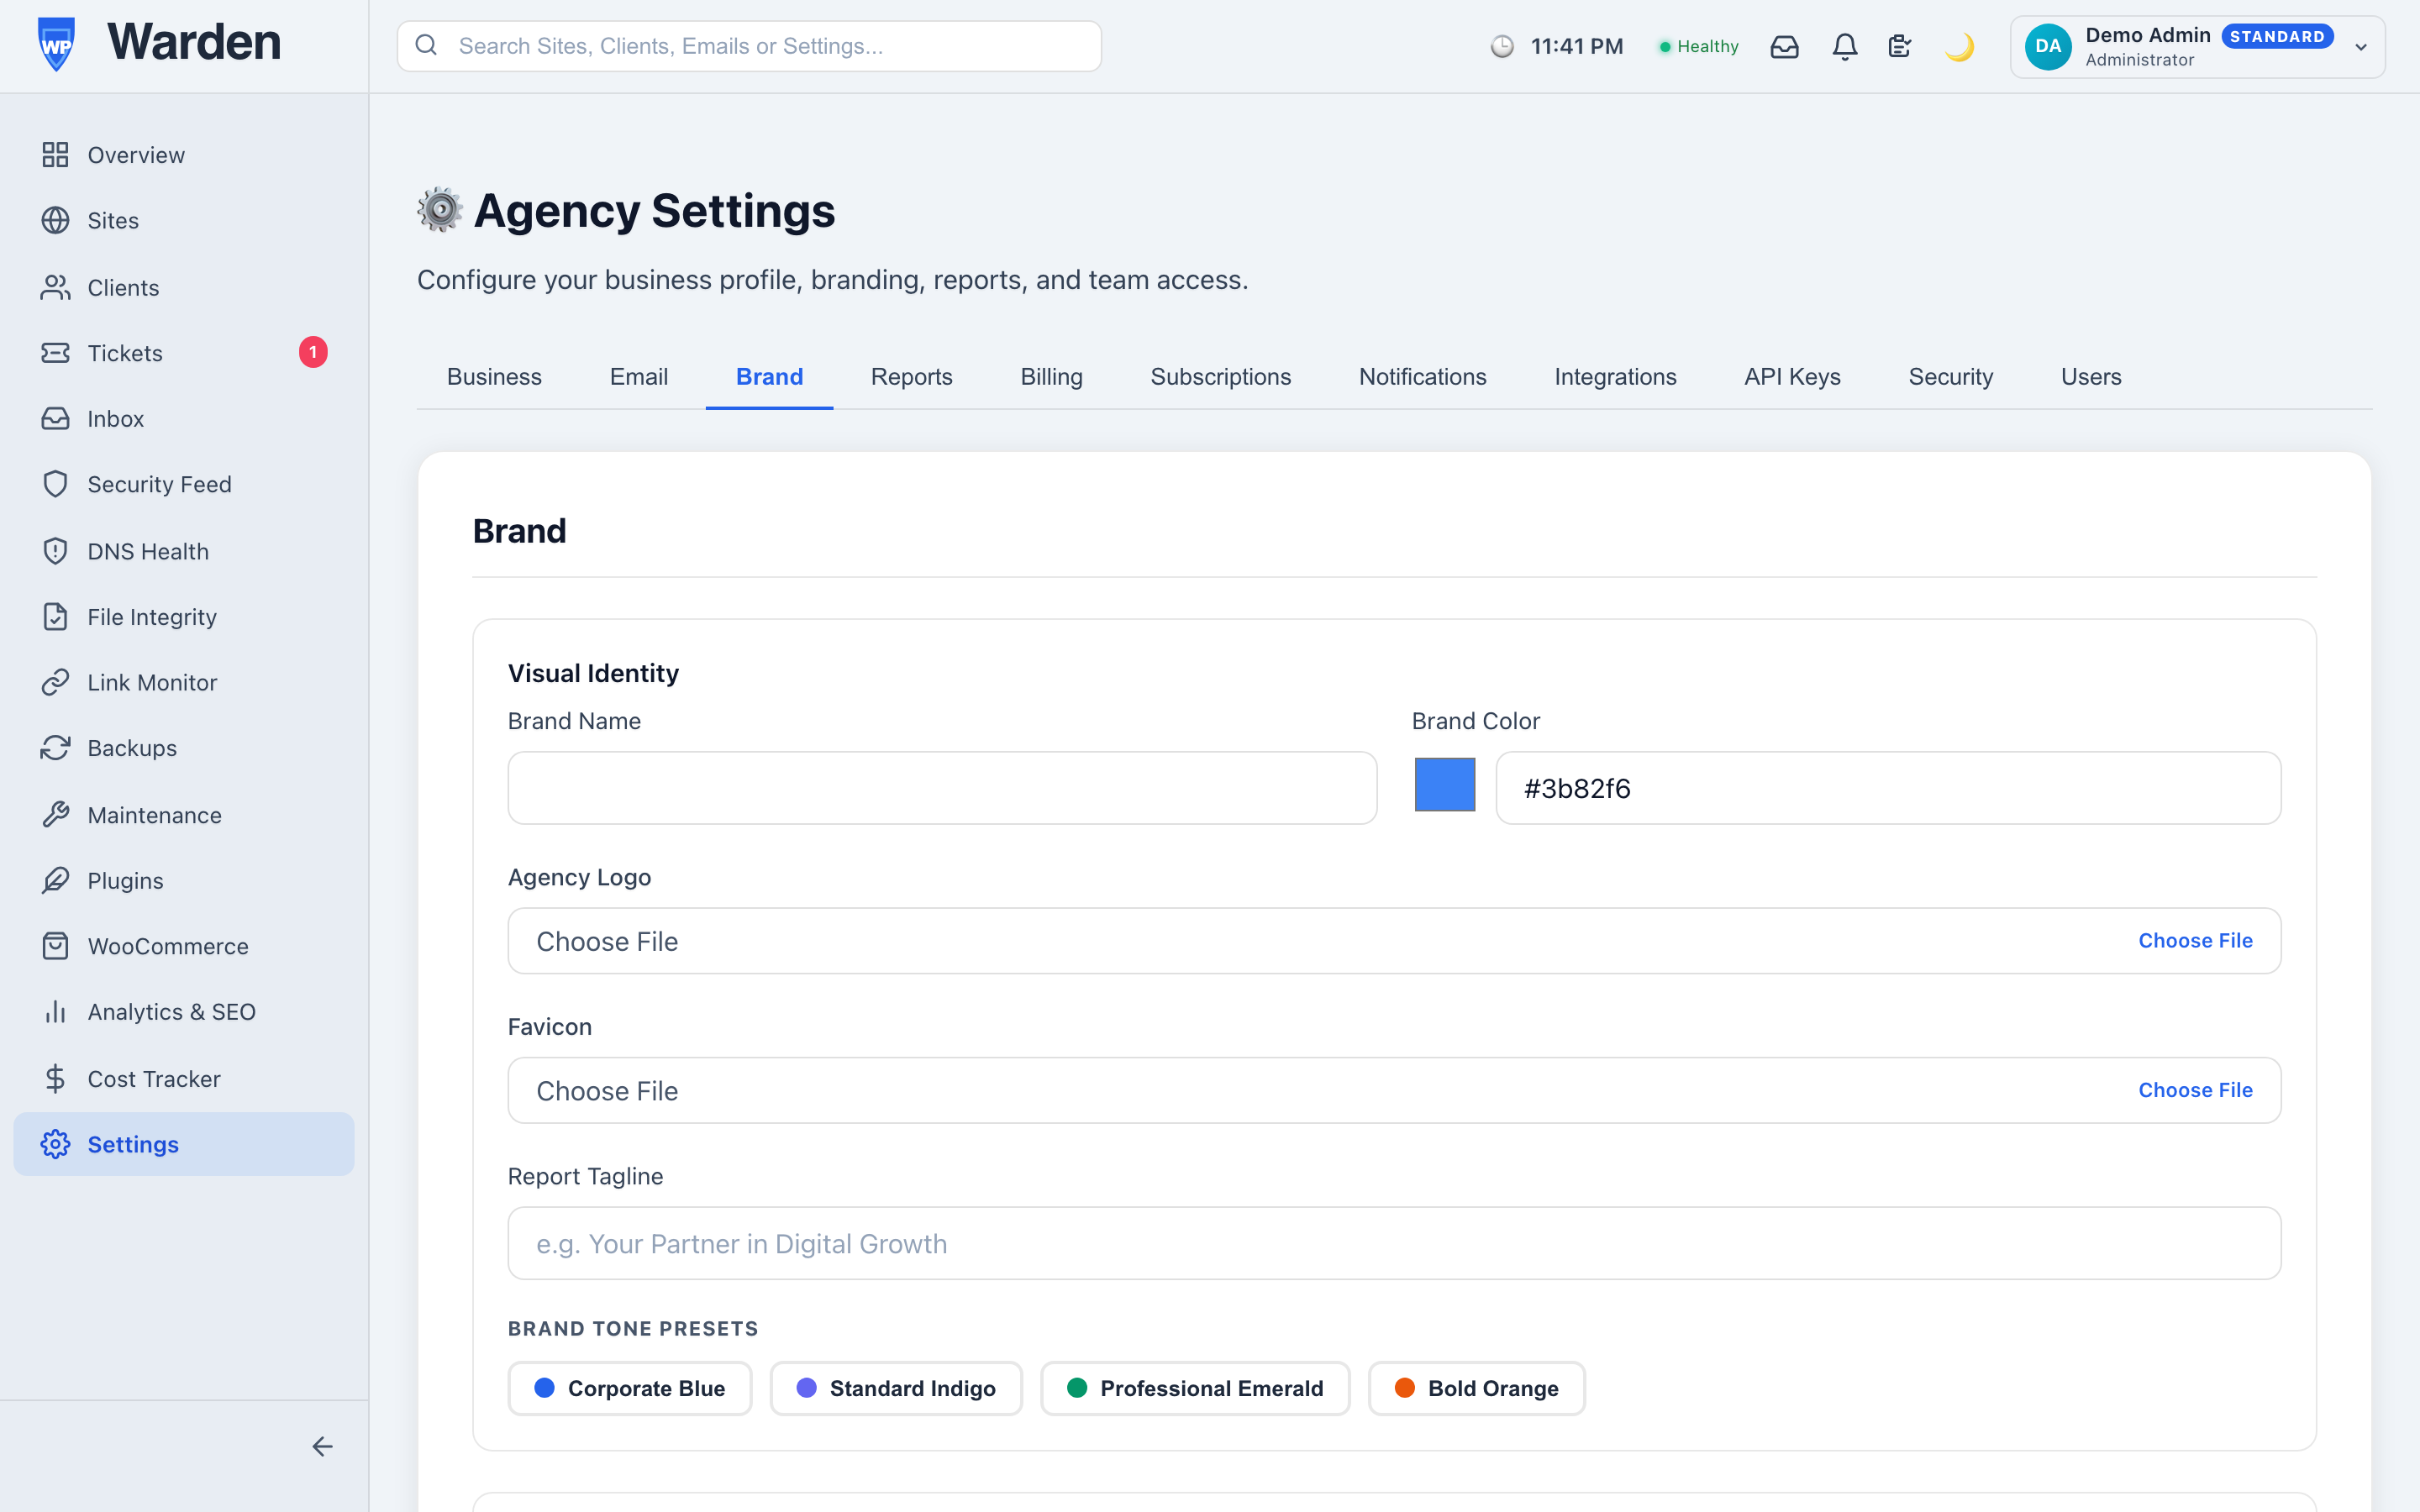 Screenshot: Settings → Brand tab
The brand core fields, tone preset buttons, email signature fields, and report options.
Check the Hide WP Warden Branding toggle to remove “Powered by WP Warden Watchdog” from all reports and portals for a completely clean white-label experience.
How to manage team members and roles
TeamAdministrators can add, edit, suspend, and delete users. Each user has a role (Administrator, Manager, or Viewer) that controls what they can access.
-
Go to Settings → Users tab
Click Settings in the sidebar, then select the Users tab. Only Administrators can see this tab. -
View the user list
All current users are listed with their name, email, role, 2FA status, and account status (Active / Suspended). -
Edit a user
There’s no dedicated edit mode: change a user’s role directly from the dropdown on their row, and (for Viewers) set their linked client from the dropdown that appears next to it. To edit their name or other profile details, open the ⋮ menu on their row and choose View User Profile. -
Suspend a user
Open the ⋮ menu on a user row and click Suspend User to prevent them from logging in. Their work history is preserved. Click Restore User from the same menu to re-enable them. -
Reset a password
Open the ⋮ menu on a user row. Click Manually Reset Password to set a new temporary password yourself — the user must change it on next login. Or click Send Reset Link for a self-service password reset link. -
Set a Viewer’s linked client
For Viewer-role users, a Linked Client dropdown appears. Select the client whose portal this viewer accesses on login. The linked client name is shown as a badge on the user row. -
Delete a user
Open the ⋮ menu on a user row and click Delete to permanently remove the user. This action cannot be undone. Consider suspending instead if you may need to restore access later.
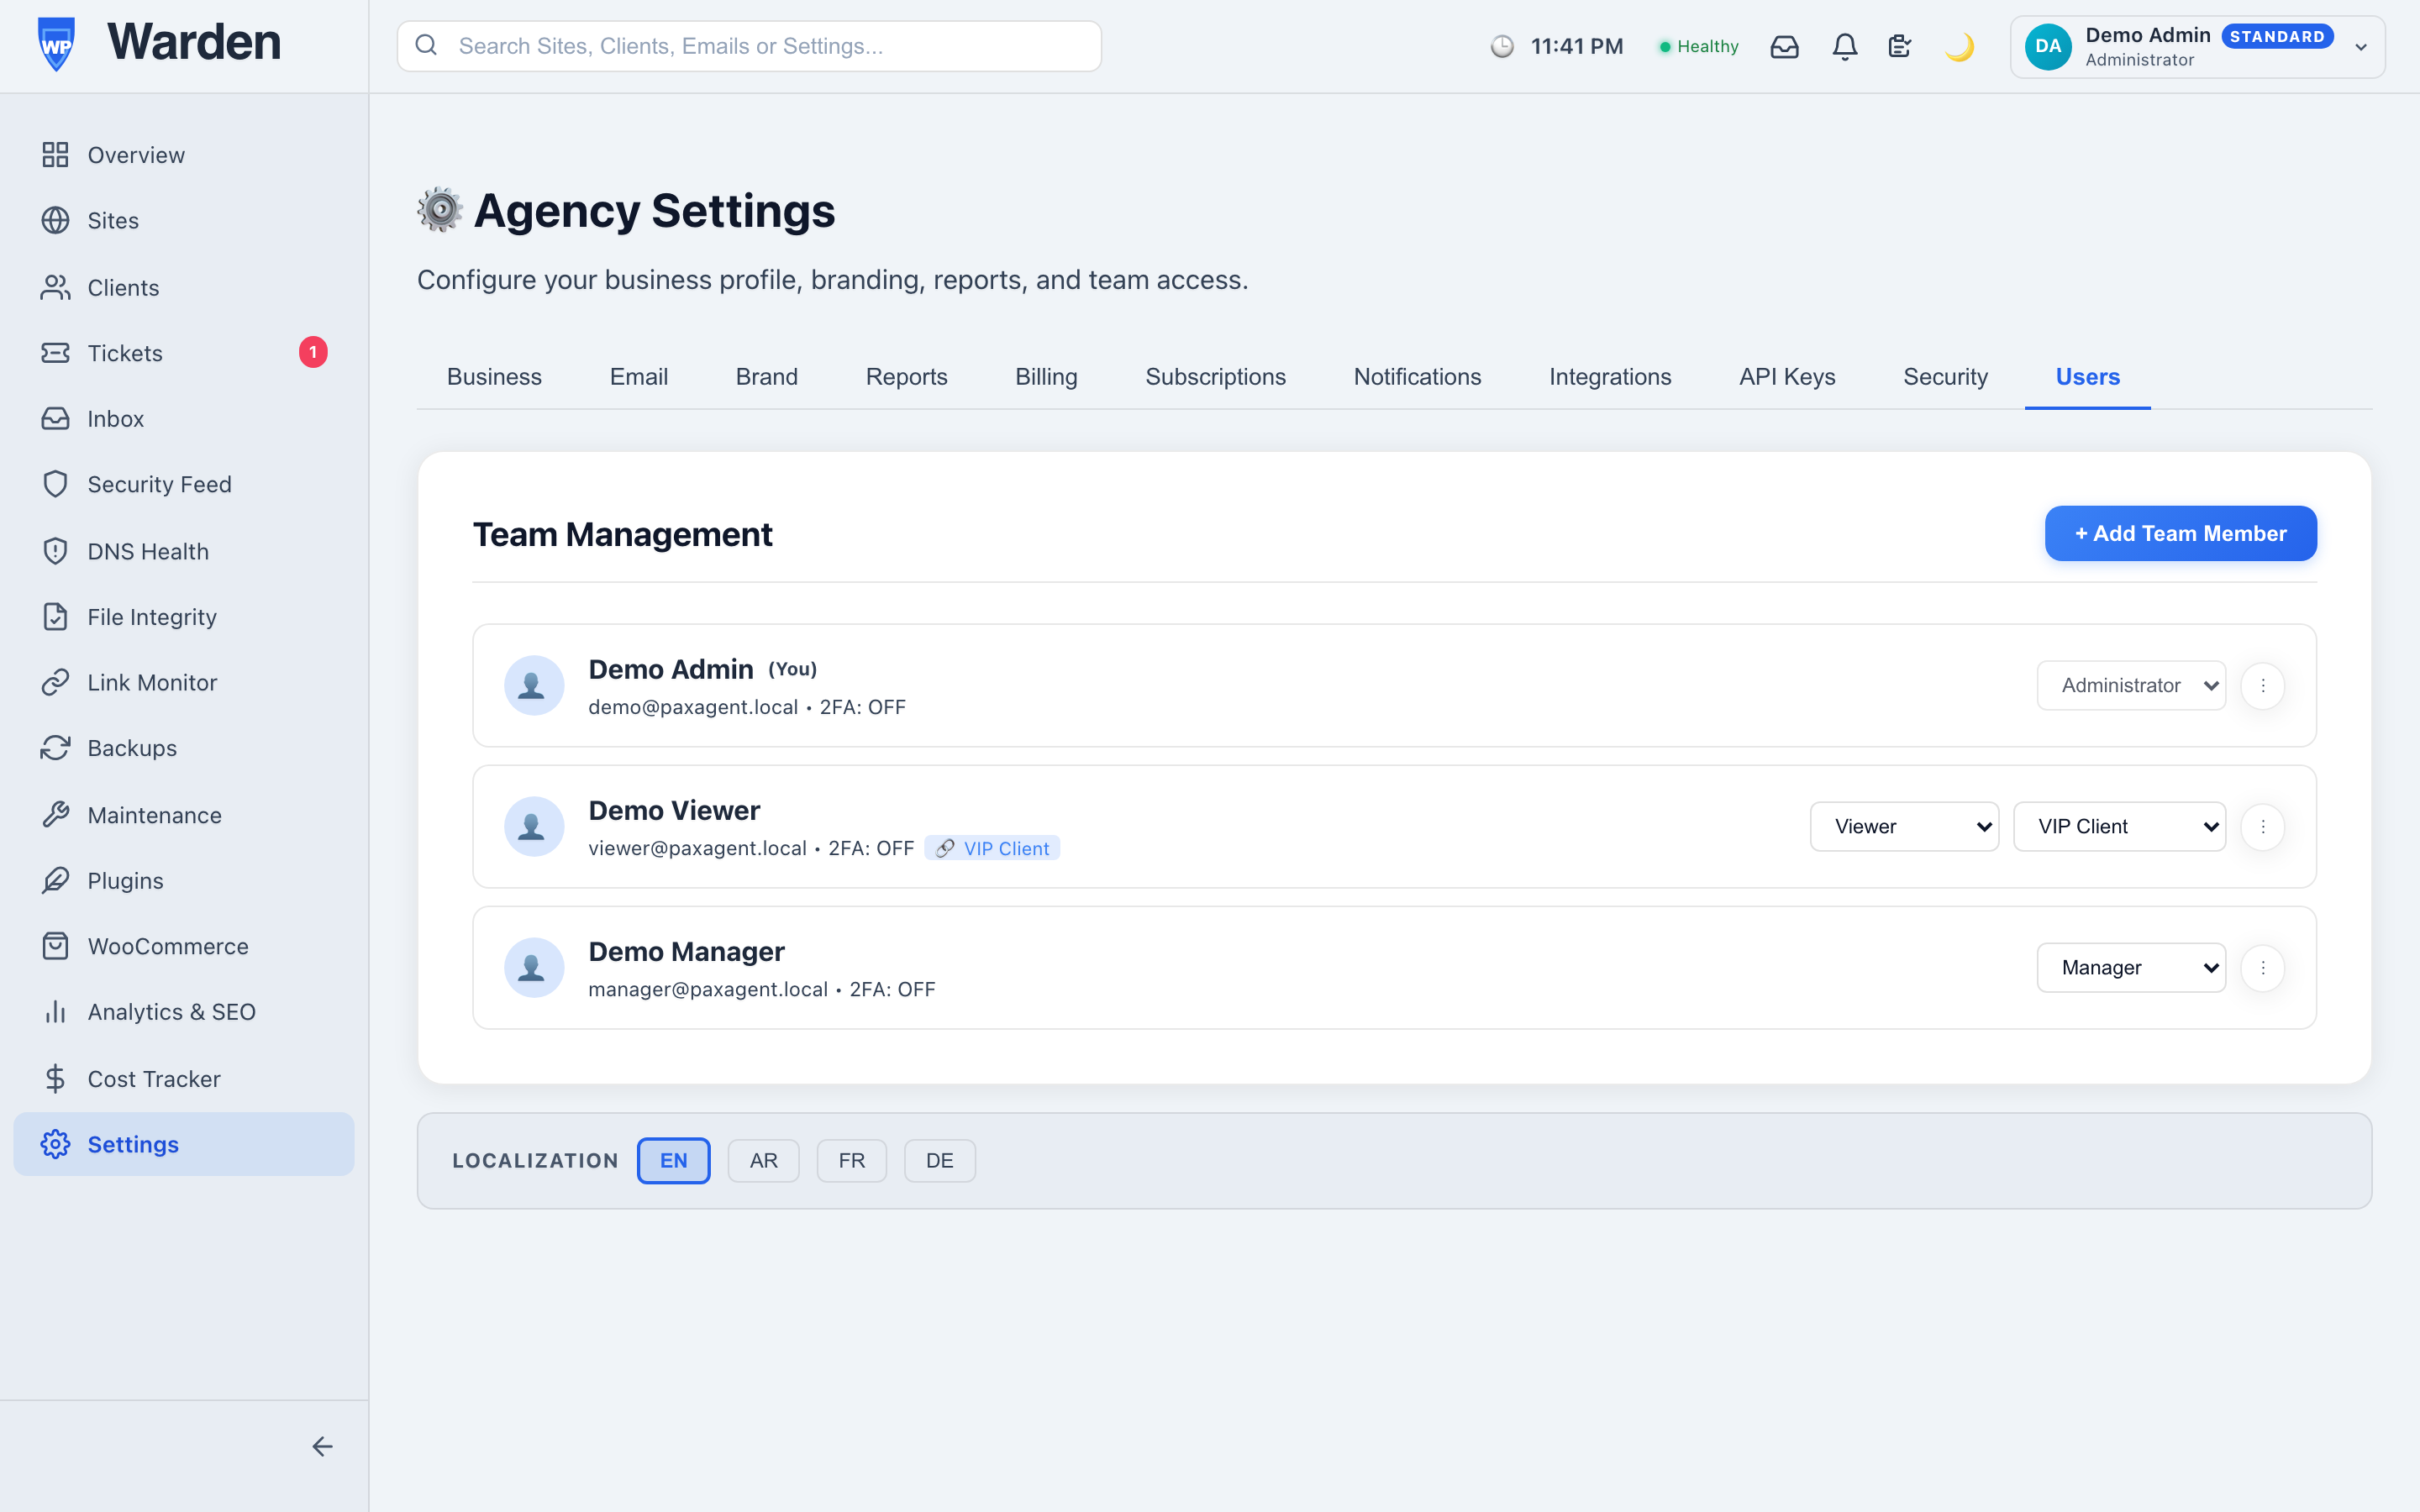 Screenshot: Settings → Users tab
The user list showing name, email, role badge, 2FA status, and action buttons per row.
Role summary: Administrator — full access. Manager — manage sites, clients, reports, backups; cannot manage users or tenant settings. Viewer — read-only; logs in and is redirected directly to their linked client’s white-label portal.
How to configure notification preferences
AlertsControl exactly which events trigger email notifications. Enable only the alert types you care about to avoid inbox overload.
-
Go to Settings → Notifications tab
Click Settings in the sidebar, then select the Notifications tab. -
Review the notification categories
- Email Alert Configuration — enable/disable email alerts, optionally send via your own SMTP, and set the Primary Alert Email
- Security Alerts — Vulnerability detections (master toggle with sub-toggles for Plugin, Theme, Core), Zombie site detection
- Site Monitoring — Downtime, Uptime recovery, Cron failures, Site conflicts, PHP errors, Broken links (with a failure-count threshold), SSL expiry, Domain expiry, Site disconnected, DNS health, File integrity, Malware signature, Brute force
- Update Alerts — Updates available, Visual regression, Safe update failures, Automated update
- Backup Failures — Backup failure, Backup ready, Restoration events
- WooCommerce Alerts — Payment failures (master toggle with sub-toggles for Gateway down, Pending orders, Failed payments, Low/out of stock)
- Ticket Notifications — New support ticket submissions
-
Toggle categories on or off
Only the Vulnerability detections toggle under Security Alerts and the WooCommerce Alerts (Payment failures) toggle work as master switches — turning either off disables its sub-toggles, which you can also expand to fine-tune independently. Every other section (Site Monitoring, Update Alerts, Backup Failures, Ticket Notifications) is a set of individual checkboxes with no group master toggle. -
Set your Primary Alert Email (optional)
By default, alerts go to your login email. Enter a different address in the Primary Alert Email field to route all alert emails there instead — useful for a shared team inbox. Check Send alerts using my custom SMTP settings to deliver them through the SMTP server configured on the Email tab. -
Save
Click Save. Changes take effect immediately on the next alert dispatcher run.
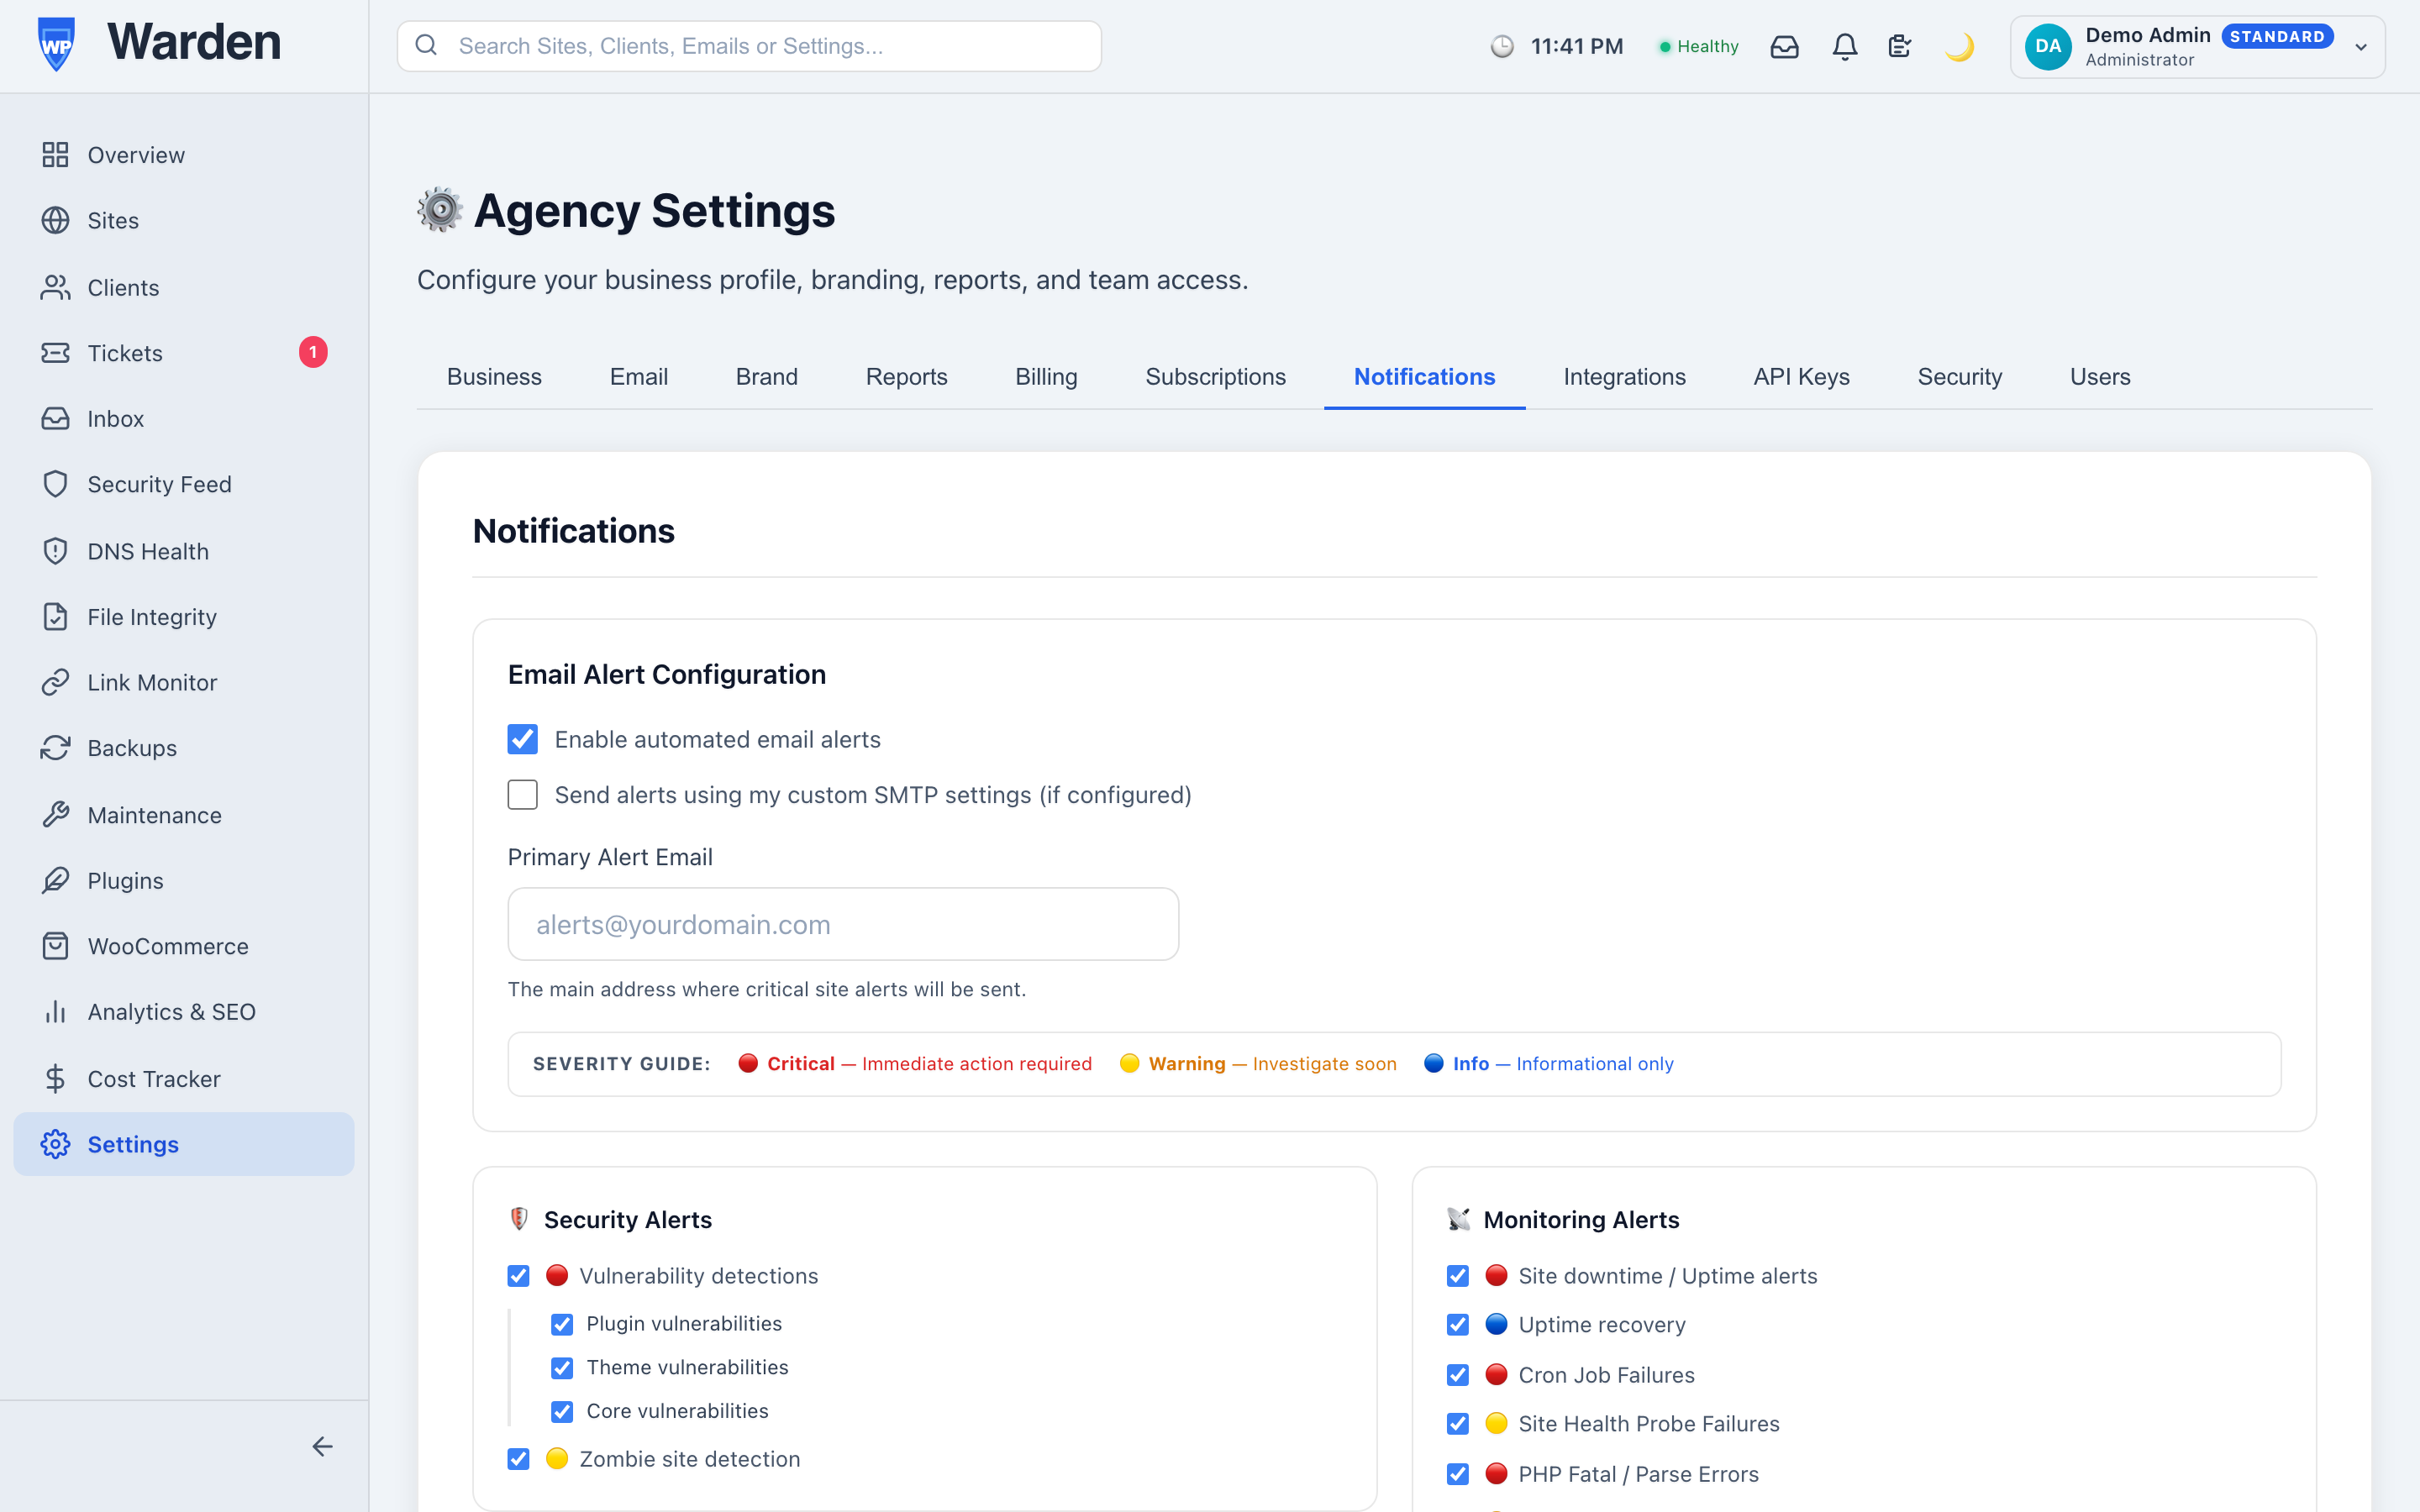 Screenshot: Settings → Notifications tab
The notification categories with master toggles, the Security sub-toggles expanded, and the custom alert email field.
If you use a Patchstack API key, vulnerabilities with an active virtual patch are automatically downgraded to Warning severity and will not trigger Critical alert emails — reducing noise without missing real threats.
The Vulnerability master toggle cascades to Plugin, Theme, and Core sub-toggles. Toggling the master on/off sets all three sub-toggles simultaneously. You can then individually fine-tune each sub-toggle.
How to set up integration webhooks (Slack, Discord, Teams)
AlertsSend your alerts straight into Slack, Discord, Microsoft Teams, or any custom automation webhook — independently of the email notifications configured on the Notifications tab. Filter by alert type and site, batch into digests, chain escalations to an on-call channel, and preview or test every delivery before relying on it.
-
Go to Settings → Integrations tab
Click Settings in the sidebar, then select the Integrations tab, and click Add Webhook. -
Choose a provider and paste the webhook URL
Pick Slack, Discord, Microsoft Teams, or Generic (JSON) for your own automation (Zapier, n8n, Make). Paste the incoming webhook URL from that platform, give it a name, and set a minimum severity — the webhook only fires for alerts at or above that level. WP Warden doesn’t issue this URL — each platform generates its own from within a channel/team’s own settings; see the links below for each provider’s own instructions. -
Filter by alert type and site (optional)
By default a webhook fires for every alert type on every site. Uncheck All alert types to pick specific types (e.g. only downtime and backup failures), and uncheck All sites to scope it to a subset of your fleet — handy for routing a client’s alerts to their own channel. -
Set a cooldown to avoid repeat noise (optional)
Set Cooldown to suppress repeat deliveries for the same site and alert type within that many minutes. Leave it at 0 to deliver every matching alert with no suppression. -
Switch to hourly/daily digest mode (optional)
Change Delivery frequency from Real-time to Hourly digest or Daily digest to roll up every matching alert into a single summary message instead of one message per alert. Once the webhook is saved, use the Test Digest button on its row to preview exactly what that rolled-up message will look like — using whatever is really queued right now, or canned example alerts if the queue is empty — without waiting for the next scheduled send and without consuming the real queue. -
Chain an escalation (optional)
Set If still unresolved after to a number of minutes and choose another one of your webhooks under notify — if an alert delivered to this webhook is still unresolved after that window, it’s automatically forwarded to the target webhook too (e.g. a general Slack channel escalating to an on-call Teams channel). An alert is only ever escalated once per target. -
Save, then test it
Click Add Webhook to save, then click Test on its row. WP Warden sends your most recent real alert that matches this webhook’s filters (relabeled “[TEST]”), or a canned fake alert if none match yet — either way, a successful delivery confirms the URL and payload format are correct. -
Review delivery history
Click History on a webhook’s row to see its last 20 delivery attempts — status (delivered, failed, skipped by cooldown, or escalated), alert type, site, timestamp, and error message if it failed. -
Duplicate, edit, or remove a webhook
Use Duplicate to clone an existing webhook’s configuration as a starting point for a new one. If another webhook escalates to the one you’re about to disable or delete, WP Warden warns you by name first — since that source webhook would otherwise stop escalating silently with no further warning.
Getting a webhook URL happens entirely on the provider’s side, not in WP Warden — we’re pointing you to where to find those steps, not repeating them, since each provider can change its own UI at any time: Slack — “Sending messages using incoming webhooks” · Discord — “Intro to Webhooks” · Microsoft Teams — “Create an incoming webhook”. For Generic (JSON), the webhook URL comes from whatever automation tool you’re pointing at (Zapier, n8n, Make, or your own endpoint) — consult that tool’s own “create a webhook trigger” docs instead.
 Screenshot: Settings → Integrations tab
The Add/Edit Webhook modal showing provider selection, alert type and site filters, cooldown, digest frequency, and escalation fields.
These webhooks are entirely separate from the email notifications on the Notifications tab — you can run both at once, e.g. email for your own team and a Slack webhook scoped to a specific client’s sites for their channel.
Deleting or disabling a webhook that another webhook escalates to no longer fails silently — WP Warden checks for dependents first and warns you which webhook(s) would stop escalating before you confirm.
How to manage subscriptions & billing plans
BillingManage your WP Warden subscription directly from Settings → Subscriptions. Every account is on the same flat-rate plan — $3 per site/month — with unlimited team members and storage included, so there’s nothing to compare or switch between.
-
Go to Settings → Subscriptions tab
Click Settings in the sidebar, then select the Subscriptions tab at the top. This tab is restricted to users with the **Administrator** role. -
Check your trial or billing status
If you’re still in your 14-day free trial, a banner shows how many days remain and the exact date it ends. Once you’ve subscribed, this section instead shows your current site count, monthly cost, and next billing date. -
Understand your bill
Your monthly cost is simply your active site count × $3/site (or × $36/site on annual billing) — there are no tiers, feature gates, or per-plan limits to track. Adding or removing sites adjusts your bill automatically on the next cycle. -
Subscribe or manage billing
Click Set Up Payment to start billing through Lemon Squeezy, or Manage Billing & Invoices to update your card, view invoices, or cancel — this opens Lemon Squeezy’s secure customer portal.
No manual plan switching: Since every account is on the same flat rate, there’s nothing to upgrade or downgrade between — your bill just scales automatically with the number of sites you’re managing.
How to create and use an API key
DeveloperWP Warden includes a versioned, scoped
public REST API (/api/v1/public) for connecting third-party tools, scripts, and AI agents to
your fleet data — separate from the internal API the dashboard itself uses. This guide covers creating a
key, calling the API directly, and wiring it into popular external tools.
-
Go to Settings → API Keys tab
Click Settings in the sidebar, then select the API Keys tab. -
Click Create API Key
Give the key a descriptive name (e.g. “LM Studio integration” or “Zapier automation”) so you can tell keys apart later. -
Choose scopes
Pick only the scopes this integration actually needs: sites:read, alerts:read, alerts:write, backups:read, backups:write, or updates:read. A key can only call endpoints covered by its scopes — everything else returns a 403. -
Copy your key immediately
Your new key (formatpax_pub_...) is shown exactly once, right after creation. Copy it into a password manager or secrets vault now — WP Warden only stores a hash of it, so it can never be shown again. If you lose it, revoke it and create a new one. -
Authenticate your requests
Send the key as a Bearer token on every request:
curl -H "Authorization: Bearer pax_pub_..." https://wpwarden.io/api/v1/public/sites
Every response is scoped to your tenant automatically — there’s no parameter for selecting a different tenant, by design. -
Explore the OpenAPI spec
Click View OpenAPI spec → on the API Keys tab (or open/api/v1/public/openapi.jsondirectly) to see every available endpoint, its parameters, and its response shape. This spec is publicly readable with no key required, so integration tools can discover the API before you’ve created a key. -
Connect it to an external tool
- Postman / Insomnia — Import the spec directly from
/api/v1/public/openapi.json(File → Import → Link), then set an Authorization header of type Bearer Token using your key. - Open WebUI — Under Workspace → Tools, add a new tool by OpenAPI URL, pointing
at your
/openapi.jsonendpoint, and supply the key as the tool’s Bearer token — every endpoint becomes a callable function for your chat model. - LM Studio — If your loaded model supports tool/function calling, define one function per endpoint you want to expose (name, description, and parameters straight from the OpenAPI spec), and have the function’s handler send the actual HTTP request with your key attached as the Bearer header.
- ChatGPT Custom GPT Actions — In the GPT editor, add a new Action, import from the OpenAPI URL, and set Authentication to API Key → Bearer, pasting in your key.
- Zapier / n8n / Make — Use their generic HTTP or Webhook module: set the URL to
an endpoint under
/api/v1/public, choose the method, and add an Authorization header with your Bearer token.
- Postman / Insomnia — Import the spec directly from
-
Revoke a key you no longer need
Click Revoke next to any key on the API Keys tab. Revoked keys stop working immediately but stay listed for audit history — they’re never deleted outright.
Rate limit: each key can make up to 60 requests per minute. Build in basic retry/backoff logic in any automation you connect, in case you hit that ceiling.
The public API is intentionally narrow: sites, alerts, backups, and update history only, matching the six scopes above. It will not expose client data, billing, or team management — treat it as a safe, limited-blast-radius credential to hand to third-party tools.